Documenting Your Algorithm
This section explains how to use the Aion user interface to simultaneously create and document your algorithm.
Main Window
Figure 2, Figure 3, and Figure 4 shows the Aion main window on Microsoft Windows, Apple MacOS, and Linux using KDE respectively.
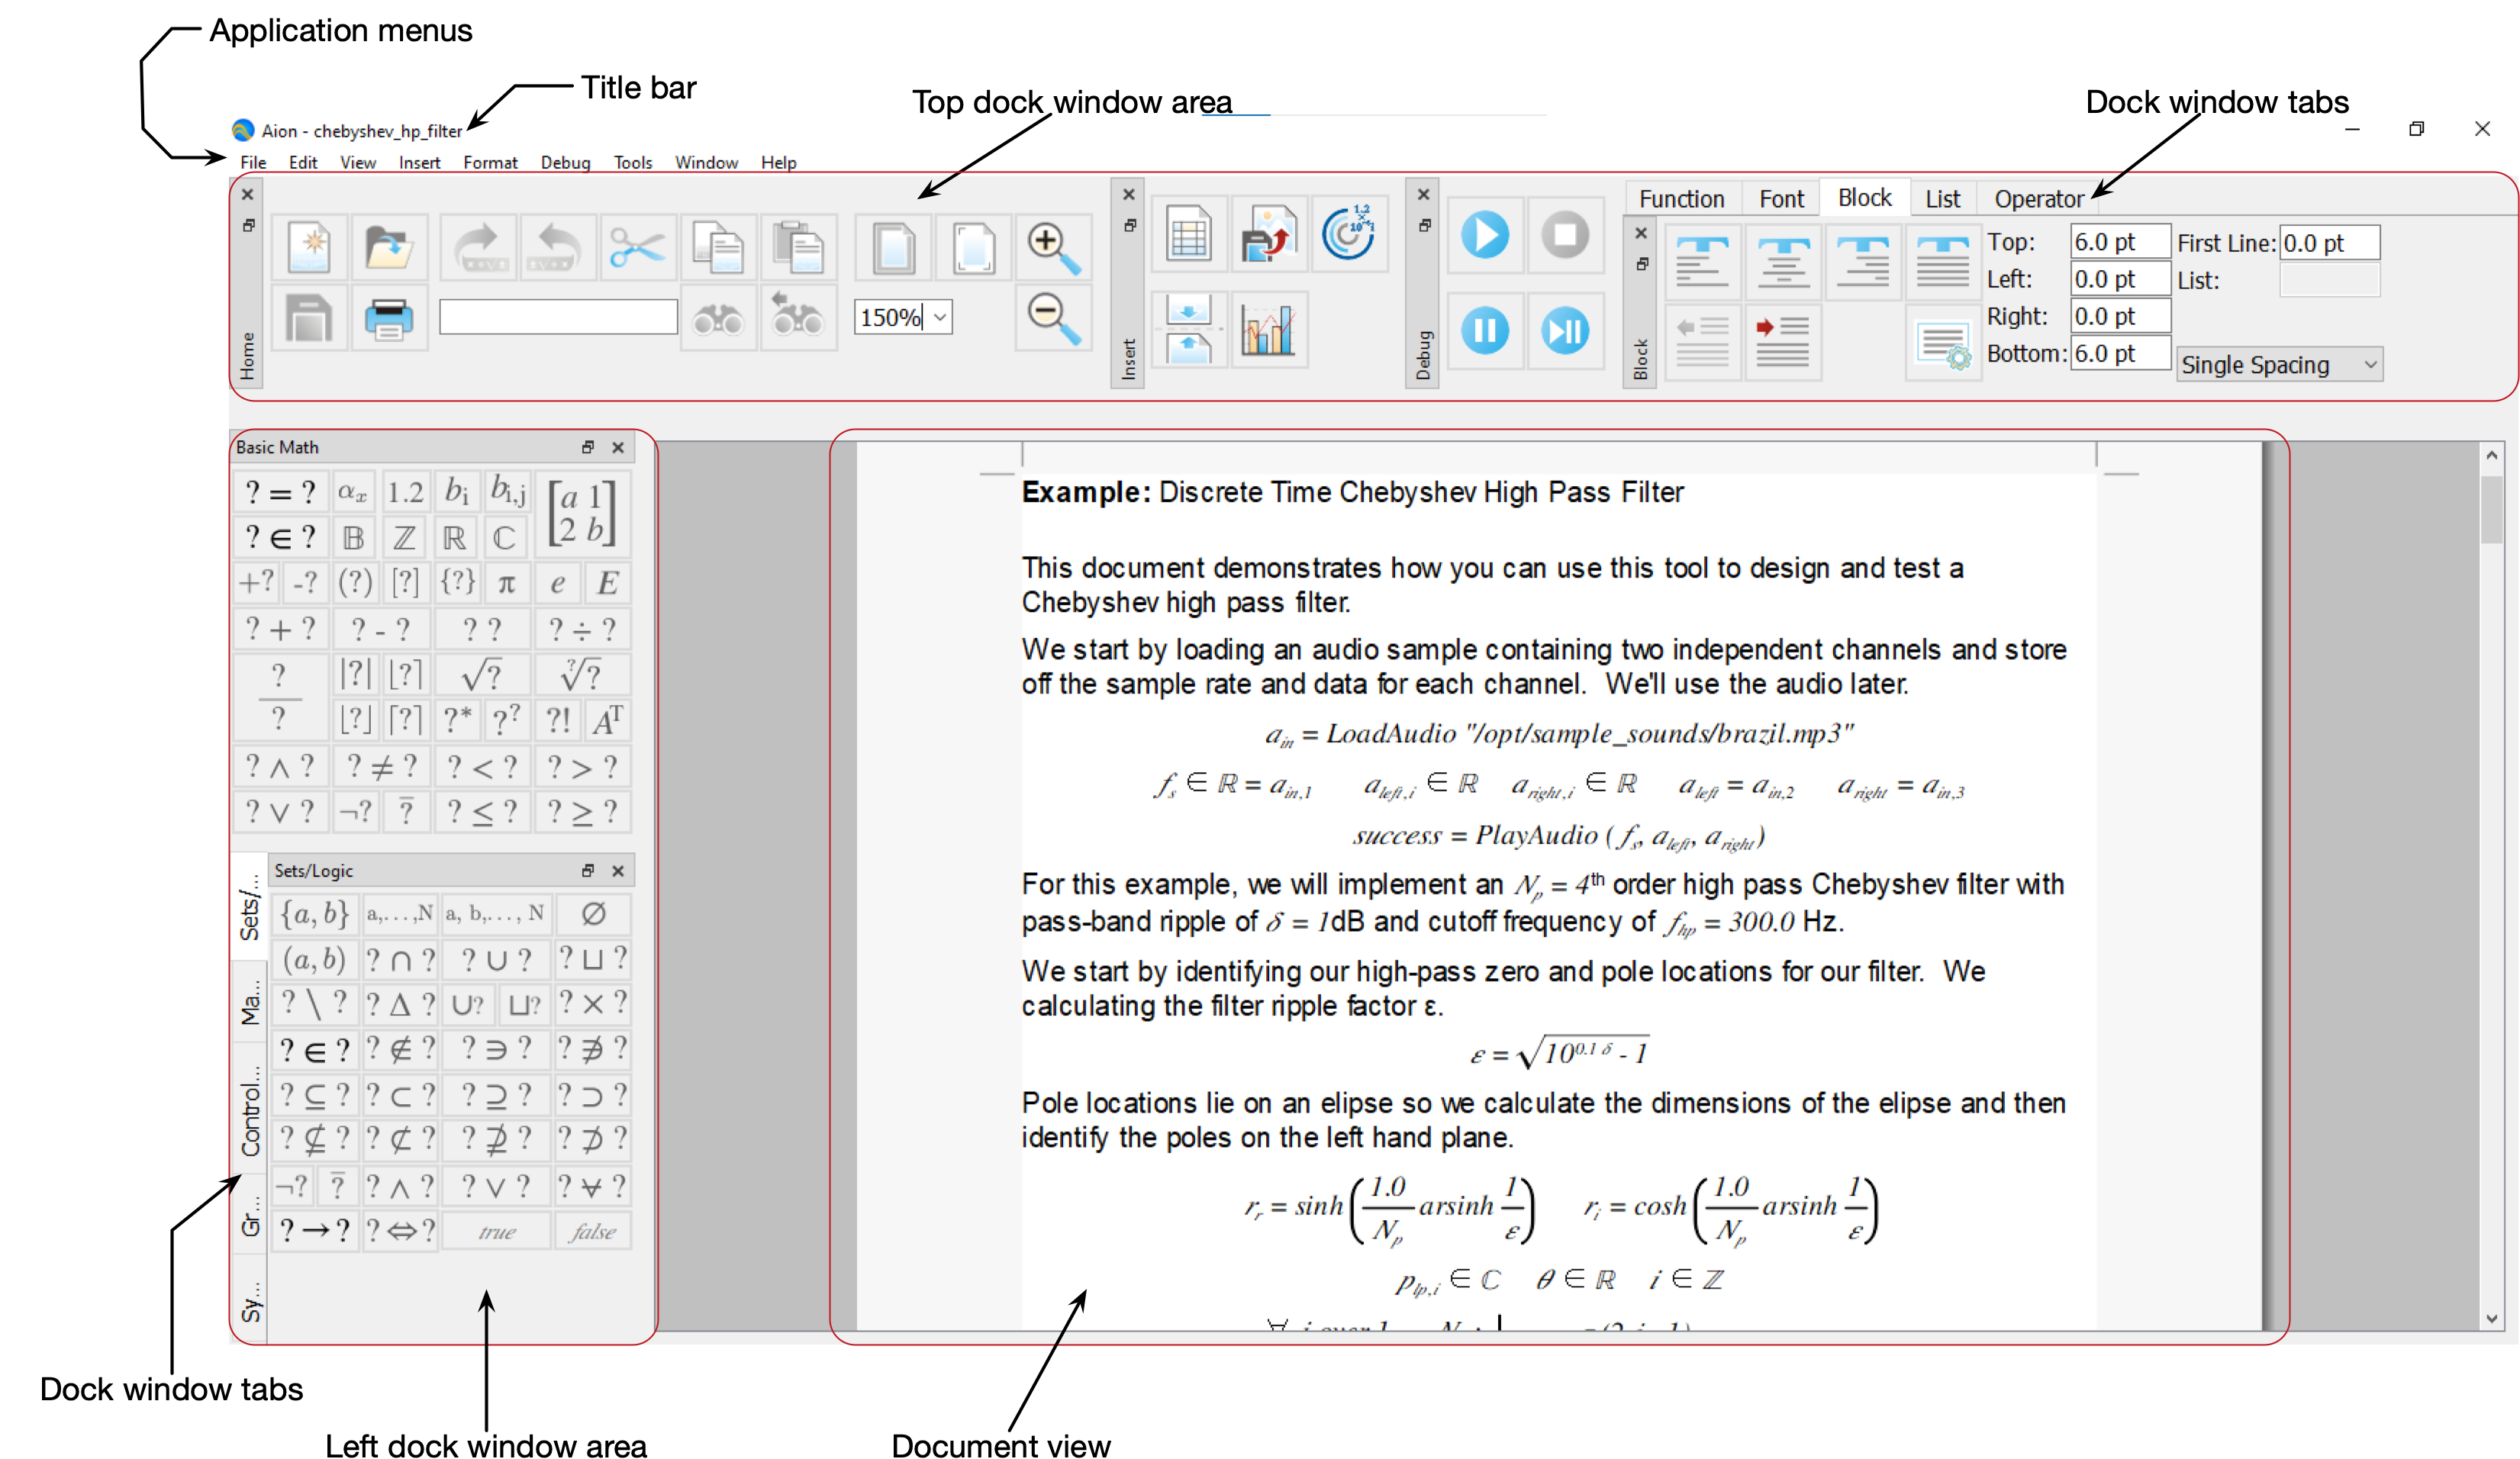
Figure 2 Aion on Windows 10

Figure 3 Aion on MacOS Catalina
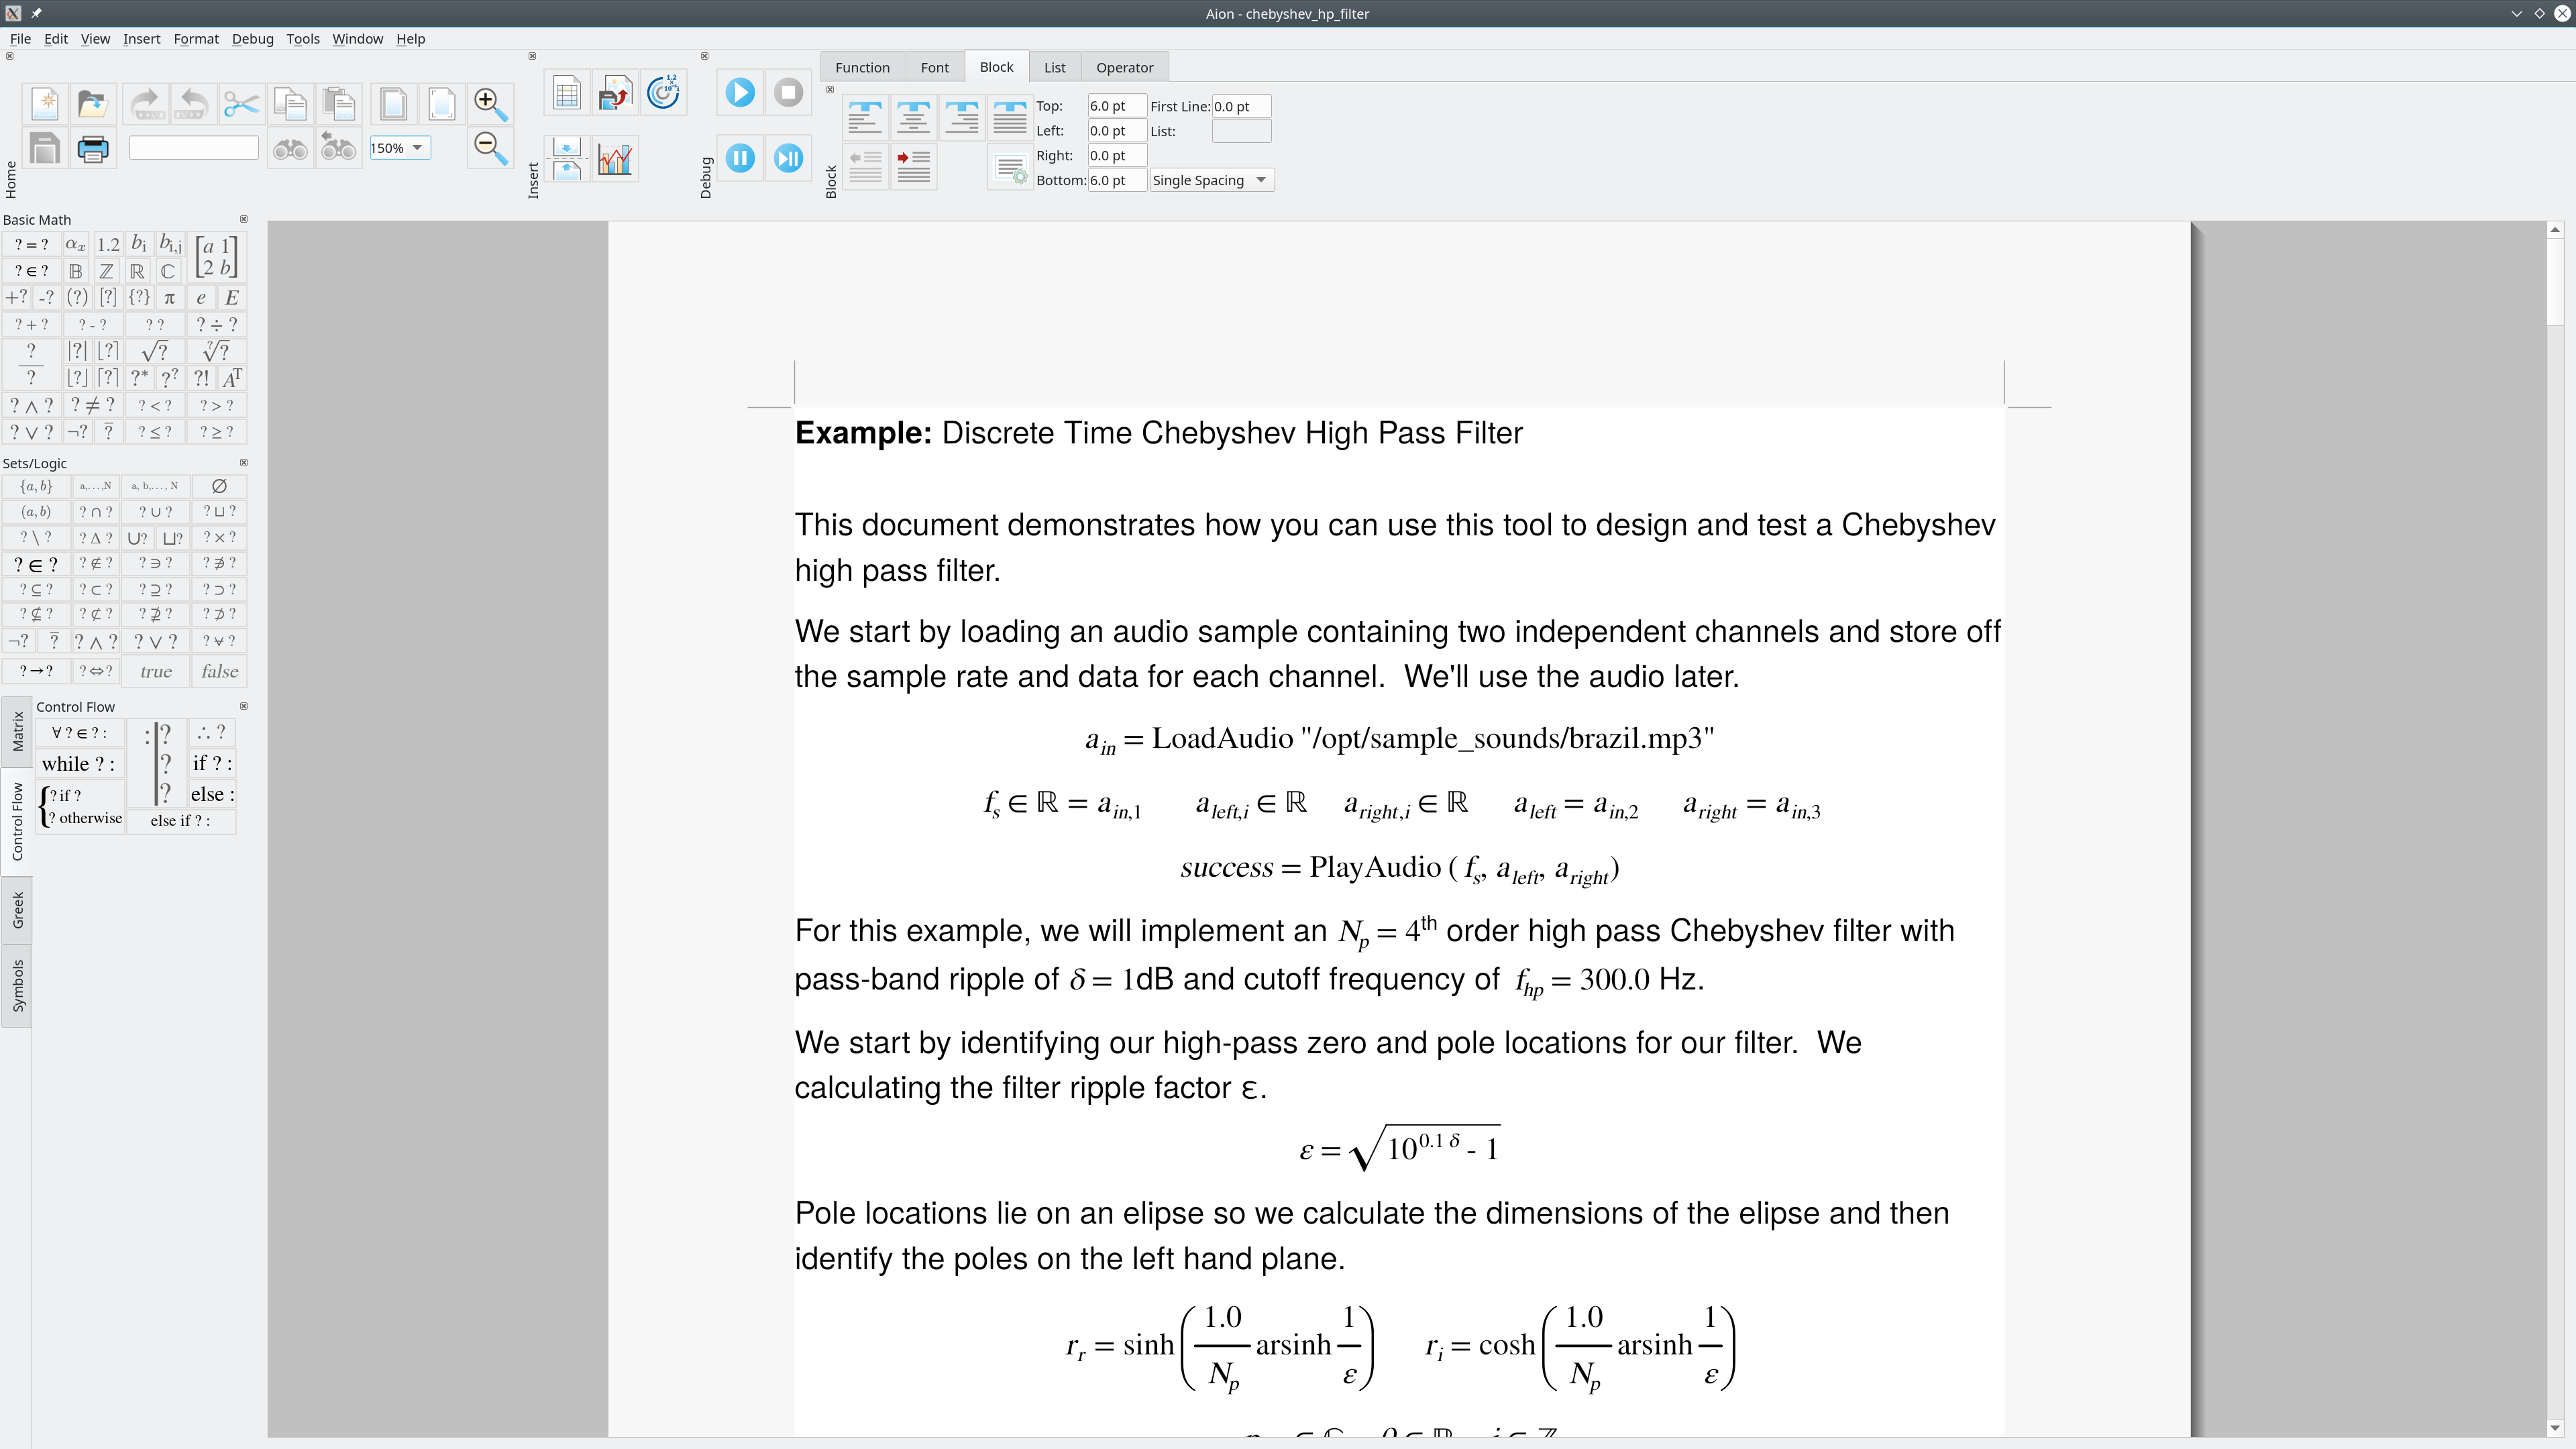
Figure 4 Aion on Linux (KDE)
The Aion user interface is similar on all three platforms.
The application main window can be broken down into a number of areas as shown in Figure 2:
The Aion title bar.
The Aion menus.
The dock areas.
Dock windows.
The editing area and document view.
The status bar (not shown above).
In addition, Aion will display a status bar only when compiling, exporting, or executing your algorithm or model and includes a number of dialogs and pop-up windows.
You can perform most operations either through the Aion menus, using the buttons and controls on the dock windows, through modal dialogs, and through a pop-up command window.
A small number of extremely common operations, such as cut and paste, undo/redo, etc. can also be performed using platform specific key sequences.
The sections that follow discuss different elements of the Aion user interface in detail.
The Title Bar
The title bar shows the product name and currently active file.
Editing Area, Document, And Document View
Most of the application main window contains the editing area. You use the editing area to create your algorithm or model, often referred to as a Document. The visible representation of your document that you can view and modify from the user interface is called The Document View. What you see in the document view will exactly match the output created when printing your model or algorithm to a file or when exporting your model or algorithm to a PDF file.
The user interface is similar to most common word processors such as Microsoft Word, Apple Pages, Open Office, or Libre Office.
Like most word processors, you can use the arrow keys, home, end, page up, and page down keys to navigate through the document view. Depending on the platform, the movement keys can be combined with the alt, or control/CTRL keys to move by Word, paragraph, etc. You can also use the mouse to position the cursor.
You can use the shift key in combination with the movement keys and mouse to select regions to be deleted, copied, or cut. Note that selections work somewhat differently on Aion compared to most Word Procesors. You will note that the selected range will adjust to impose several basic rules when selecting content within equations.
On Windows and Linux, you can also underline, boldface, or italize text using
CTRL-u, CTRL-b or CTRL-i respectively. On MacOS, you can use  -u,
-b, or -i to underline, boldface, or italize text.
-u,
-b, or -i to underline, boldface, or italize text.
In addition, you can enter backslash commands directly by pressing the backslash (‘’\’’) key. See Command Window for details on entering and using backslash commands.
Through the menus, or backslash commands, you can add or remove tabs at the bottom of the document view and can use the tabs to maintain multiple views into the same document or separate views into multiple documents. You can also open new Aion windows that can either show different views into the same document or views into different documents. Each Aion window can have multiple tabs. Using multiple document views allows you to simultaneously view different sections of the same file or different files.
Right-clicking on a document view tab will also bring up a pop-up menu, shown in Figure 5, with a small number of useful controls.
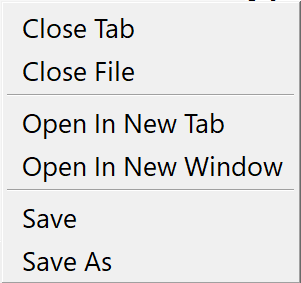
Figure 5 The Document Tab Popup Menu
Note that placing the cursor over mathematical elements may display a small window providing additional information such as the current value or type of a variable or an error associated with a mathematical element.
Dock Windows And Dock Areas
Almost all functions can be accessed from dock windows that can be placed along any of the four edges of the application window. The four edges where the dock windows can reside are called dock areas. On MacOS and Windows, the dock windows can also float.
You can also hide dock windows that you do not find useful by clicking on the
close button on the dock window. Alternately, you can hide or show a dock
window through the View | Dock | ... menu items. You can also show or hide
any dock through the command window.
Dock windows support both a horizontal and a vertical mode. When docked in the top or bottom dock area, or when floating, the dock windows will be displayed in their horizontal mode. When docked in the left or right dock areas, the dock windows will be displayed in their vertical mode. The available controls are the same in each display mode.
Lastly, you can stack dock windows on top of each other in any of the dock areas. When you do this, dock window tabs will appear. You can select which dock to show by clicking on the tab associated with the dock.
Note
There are a number of specialized dock windows that are available but hidden
by default. Used either the View | Dock | ... menu items or the command
window to enable these docks.
Right Click Menu
You can access a pop-up menu, shown in Figure 6, by right-clicking in the editing area. On Apple MacOS, you can access the pop-up menu by two finger clicking in the editing area. The right-click menu contains widely used functions available in other menus but located in a single convenient location.
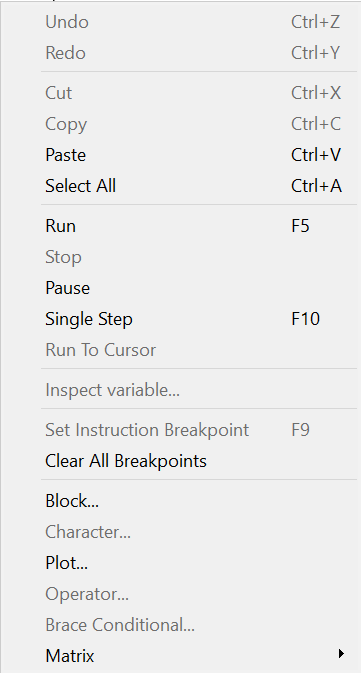
Figure 6 The Right-Click Menu
Command Window
You can use the command window, shown in Figure 7, to access almost all the functionality of Aion. All commands begin with a leading backslash, (‘’\’’). The command window will only provide commands that are allowed based on the the position of the cursor and application state.

Figure 7 The Command Window
For example, you can insert a fraction using the command \frac followed by
pressing space or return. To enter a backslash, enter a backslash twice
followed by a space or return.
In many cases, commands will be the same as those used in LaTeX. There may also be several commands that provide the same function, one matching what would be used in LaTeX and another more concise version.
Section Backslash Commands provides a complete list of commands.
Application Menus
The application menus vary somewhat by platform. The sections that follow document each available application menu.
Aion Menu (MacOS Only)
The Aion Menu, shown in Figure 8, exists only on MacOS.

Figure 8 The Aion Menu (MacOS Only)
You can use The Aion | About Aion menu option to obtain information about the software release as well as user licensing information. You can also obtain information about the currently installed plug-ins by clicking on the Plug-Ins button.
You can use the Aion | Preferences menu option to change application global preferences including:
The default fonts for new documents.
The default page sizes for new documents.
Rendering of several operators.
The default entropy source for random variates.
Resolution settings for rendering text and graphics.
Whether Aion reports anonymized usage information to Inesonic, LLC to support continuous product improvements.
The menu options Aion | Services, Aion | Hide Aion, Aion | Hide Others, and Aion | Show All are standard menu options on MacOS. The Aion | Services option allows you to adjust MacOS related services. The Aion | Hide Aion menu option will hide Aion from the desktop while the Aion | Hide Others menu option will hide all applications other than Aion from the desktop. The Aion | Show All menu option will show all applications on the desktop.
The Aion | Quit menu option will close the Aion application. You will be prompted if you have any unsaved work.
File Menu
The File Menu, shown in Figure 9, provides basic file related functions you can use to load and save documents from or to media. The File Menu also provides the ability to export documents to a number of common formats, generate binary object files and dynamic libraries you can link against, other programs, and the ability to manage imports.
Note that the File Menu varies slightly by platform. On MacOS, the File Menu does not include the File | Quit menu option.
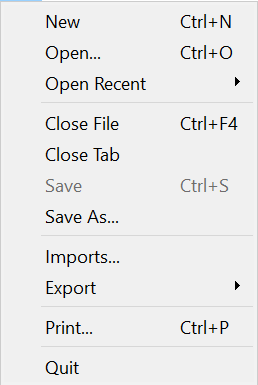
Figure 9 The File Menu On Windows
You can use the File | New menu option to create a new file.
You can use the File | Open… menu option to open an existing file as a document in a new document view. If you already have open document views, the document will be displayed in its own tab. Figure 10 shows the Load File dialog on Windows.
You can use the File | Open Recent submenu to quickly select and open a recently accessed file.
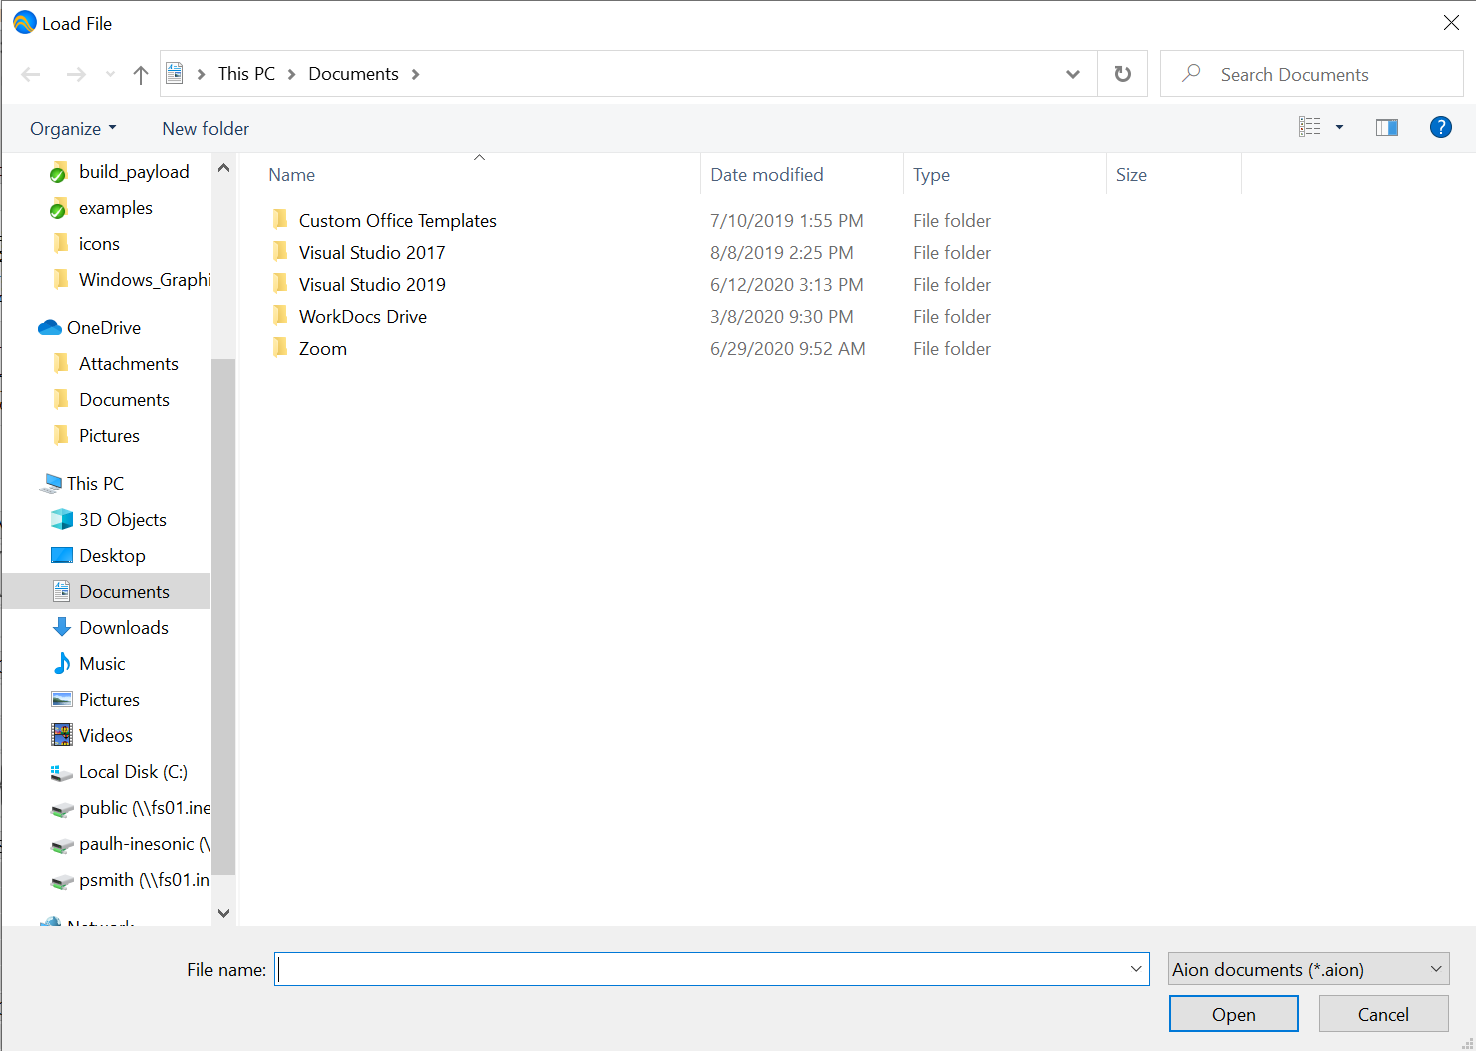
Figure 10 Windows Load File Dialog
The File | Close File menu option will close the current document. If the
document is being displayed in multiple tabs or in multiple windows, all tabs
that show the current document will be closed. See Section
Editing Area And Document View for an overview of the use of tabs
and multiple window. You will be prompted if the file you are closing contains
unsaved changes.
The File | Close Tab menu option will close only the current document view of
a document. If the current tab is the only tab displaying the selected file,
then the file will be closed. In this scenario, you will be prompted if the
file you are closing contains unsaved changes. See Section
Editing Area And Document View for an overview of the use of tabs
and multiple window.
The File | Save menu option will save any pending changes under the current filename. You will be prompted for a filename and location using the Save File in Figure 11 if the document has never been saved to media.
You can use the File | Save As menu option to save the current document to a new file. You will be prompted for a filename and location using the Save File dialog in Figure 11 for the document.
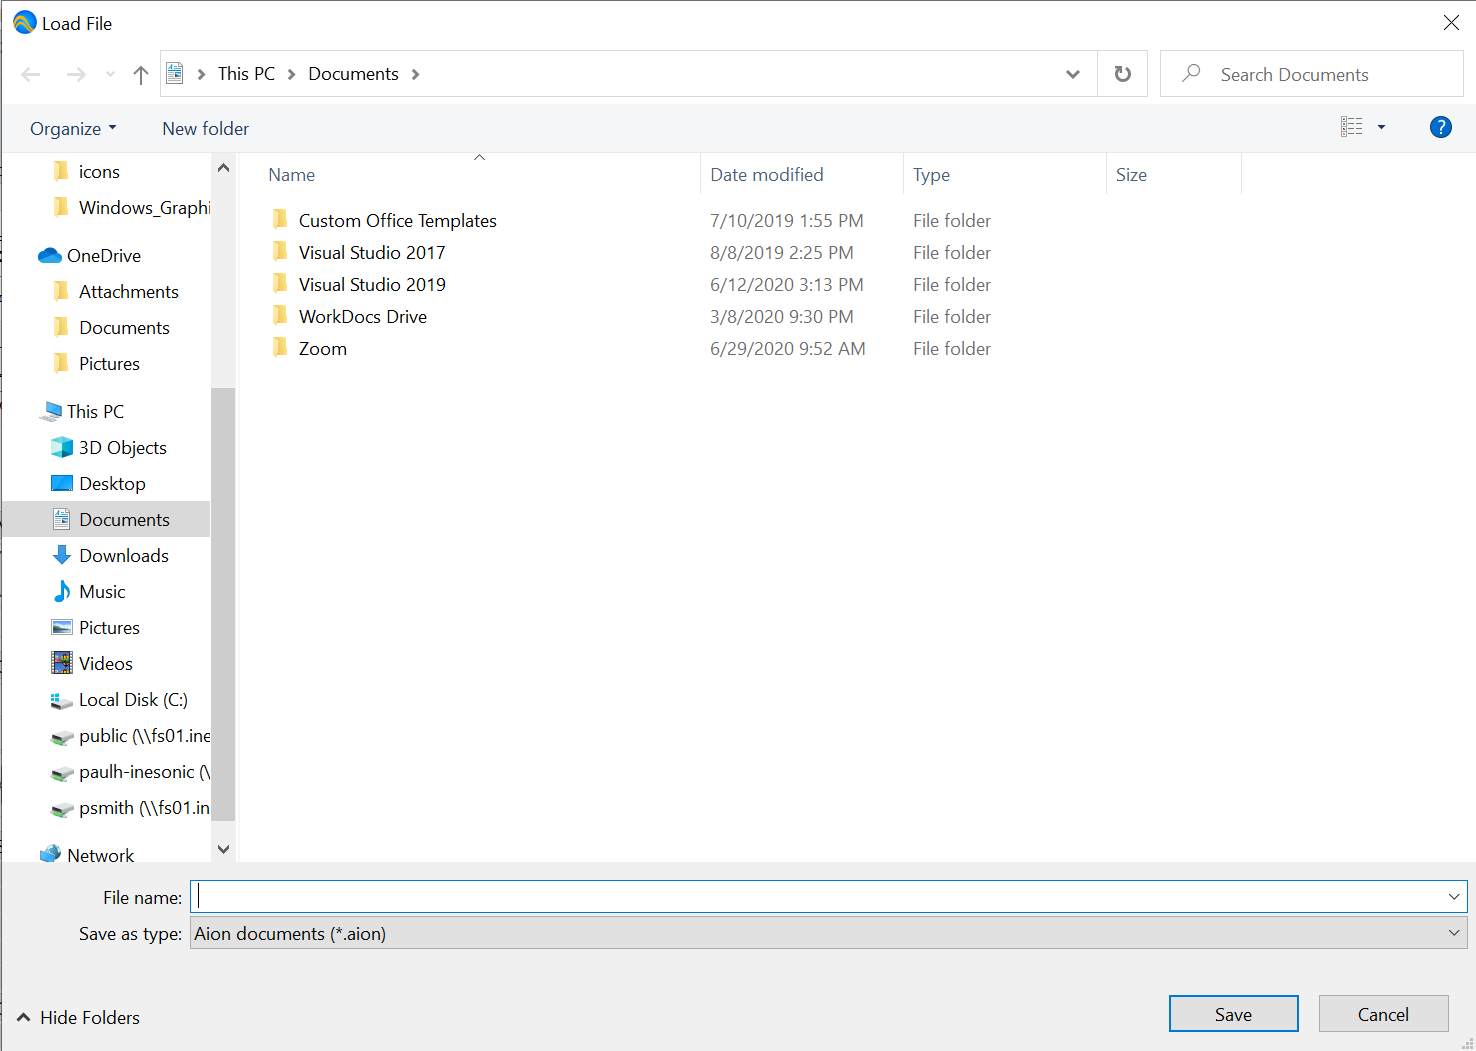
Figure 11 Windows Save File As Dialog
You can use the File | Imports… menu option to manage the Aion imports feature which allows you to distribute your algorithm or model across multiple files or reference work done in other files within the current document. For details, see Imports.
You can use the File | Export submenu to export the current document in a number of formats. For details, see Export Submenu.
You can use the File | Print menu option to print the current document or a portion of the current document to a printer. Selecting this menu option will bring up a dialog allowing you select a range of pages, select a printer, and manage common printer settings.
Lastly, on Windows and Linux, you can use the File | Quit menu option to exit Aion. You will be prompted if any currently open documents have unsaved changed.
Export Submenu
The Export Submenu, shown in Figure 12, provides functions you can use to export your algorithm or model in a number of different user readable and binary formats.
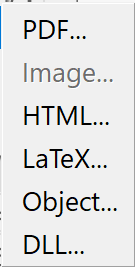
Figure 12 The Export Submenu On Windows
You can use the File | Export | PDF… menu option to export some or all of the current document to a PDF file. Selecting this option will bring up the Export PDF dialog shown in Figure 13.
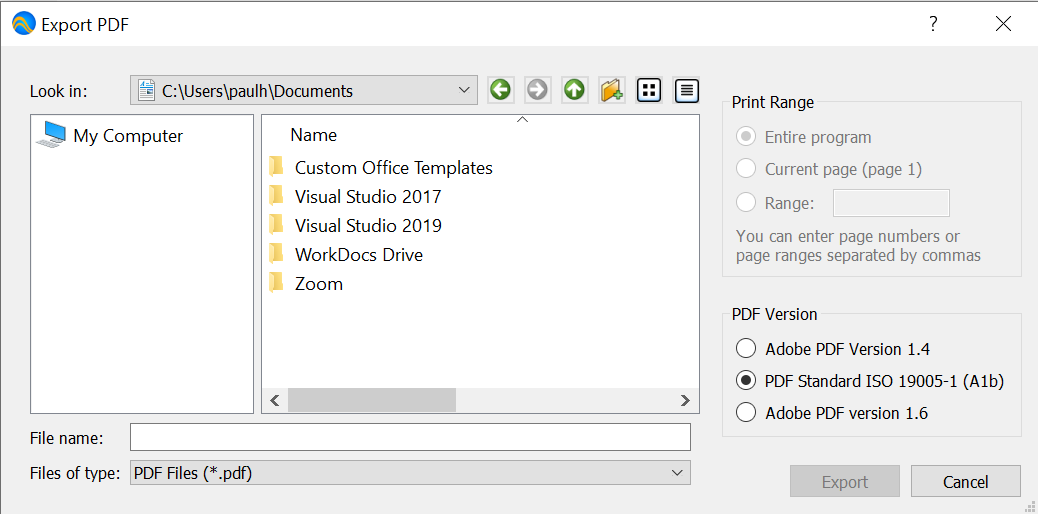
Figure 13 Export PDF Dialog On Windows
You can use the File | Export | Image… menu option to export an image of the currently selected item within the document view. A wide range of image formats are supported.
You can use the File | Export | HTML… menu option to export the current document to HTML format. Selecting this option will bringup the Export HTML dialog shown in Figure 14. Note that the exported HTML may reference external content such as the MathJax Javascript library. You can also include the imports in the order that they would be used by your model or algorithm.
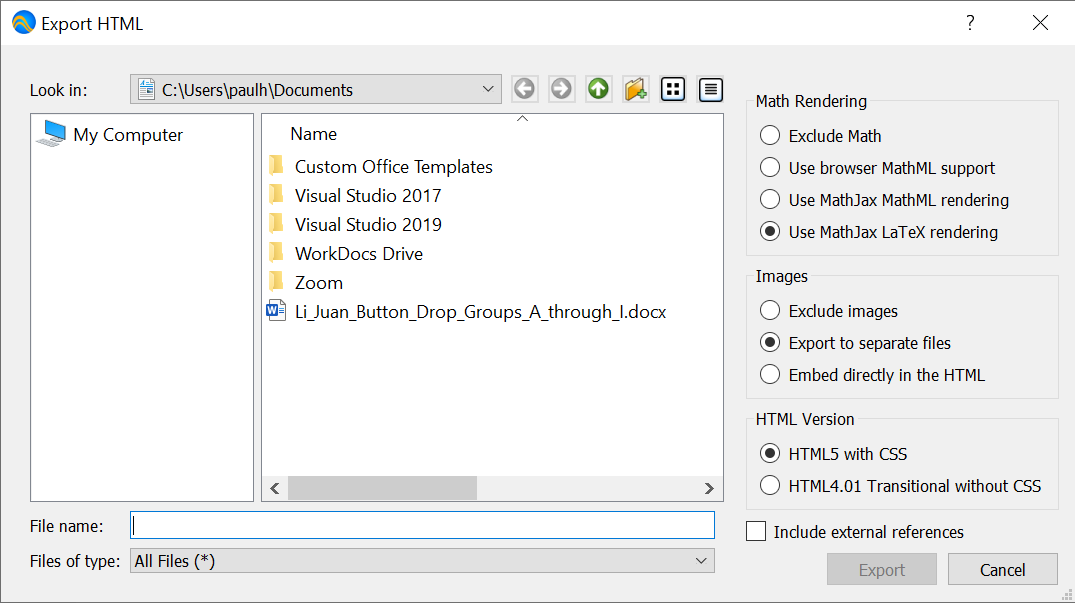
Figure 14 Export HTML Dialog On Windows
You can use the File | Export | LaTeX… menu option to export the current document to LaTeX format. Selecting this option will bringup the Export LaTeX dialog shown in Figure 15. Note that the exported LaTeX will require a number of common LaTeX packages available from CTAN and will render differently than seen in the document view. Similar to the HTML export, you can also include the imports in the order that they would be used by your model or algorithm.
Note
The LaTeX output is specifically designed to be easily edited and included in larger works. The LaTeX output will not precisely match the format and spacing as seen in the document view.
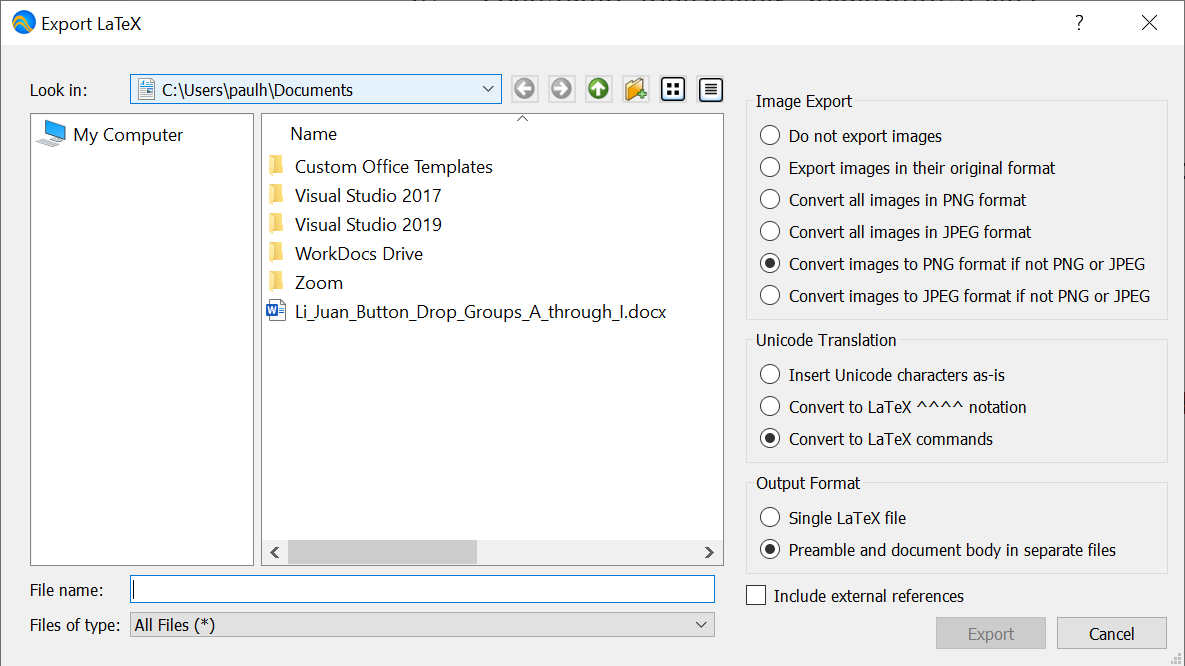
Figure 15 Export LaTeX Dialog on Windows
You can use the File | Export | Object… menu option to export the current document as a platform specific binary object file that you can link against other programs. For details, see Deploying Your Algorithm.
The File | Export | DLL… menu option on Windows and the File | Export | Dynamic Library menu option on Linux and MacOS allow you to export the current document as a platform specific dynamic library that you can link against your own programs. For details, see Deploying Your Algorithm.
Edit Menu
The Edit Menu, shown in Figure 16, provides common editing functions.
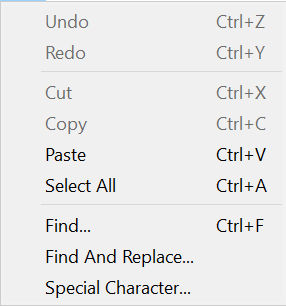
Figure 16 The Edit Menu On Windows
The Edit | Undo menu option allows you to undo the last operation. You can
use this operation repeatedly to undo multiple operations. Note that some
operations, such as typing a character are grouped together. Note that you
can also use the shortcuts CTRL-z on Windows and Linux or -z
on MacOS.
The Edit | Redo menu option allows you to redo an operation you just undid
using Edit | Undo. If needed, you can redo multiple undo operations. Note
that you can also use the shortcut CTRL-SHIFT-z on Windows and Linux, or
-SHIFT-z on MacOS.
The Edit | Cut menu option cuts the current selection to the application
clipboard. You can also use the shortcut CTRL-x on Windows and Linux, or
-x on MacOS.
The Edit | Copy menu option copies the current selection to the application
clipboard. You can also use the shortcut CTRL-c on Windows and Linux, or
-c on MacOS.
The Edit | Paste menu option will paste the current application clipboard
content at the current cursor position. You can also use the shortcut CTRL-v
on Windows and Linux, or -c on MacOS.
Note
Pasting is only allowed when the content in the application clipboard meets all the requirements required by the location you’re pasting into. As an example, you can-not paste a multiplication operator directly into text as doing so would create a construct that is not supported by the tool. Similarly, you can not paste an image into an equation as an image would no sense within the context of an equation.
The Edit | Select All menu option will select the entire contents of the current document.
The Edit | Find… menu option will bring up the Search & Replace dialog that you can use to find text within the current document. The Find dialog includes a number of advanced features such as case sensitive search, support for Perl regular expressions, and find and replace capabilities (hidden by default). Figure 17 shows the default Search Dialog.
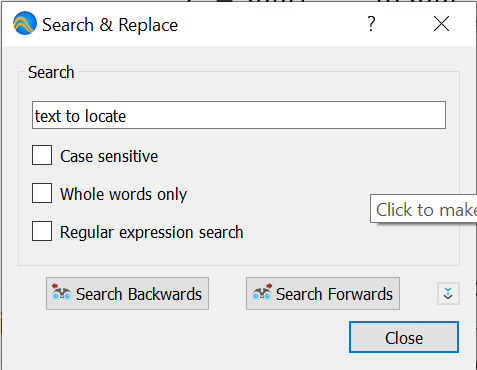
Figure 17 Search & Replace Dialog On Windows
For details on Perl regular expressions, see http://perldoc.perl.org/perlre.
The Edit | Find And Replace.. menu option will bring up the Search & Replace dialog you can use to find and then replace text within the current document. This is the same dialog used by Edit | Find… but with the replace functions enabled. Figure 18 shows the Search & Replace Dialog with replace functionality enabled.

Figure 18 Search & Replace Dialog On Windows (Replace Functionality Enabled)
On MacOS, The Edit Menu also includes two platform specific menu options:
Edit | Start Dictation… which enables MacOS’s dictation feature, and
Edit | Emoji & Symbols which allows you to embed arbitrary characters.
On Windows, The Edit Menu also includes the Special Character… menu option you can use to embed arbitary characters.
View Menu
The View Menu, shown in Figure 19, provides functions you can use to modify how you see the document view as well as functions to show or hide the various docks.
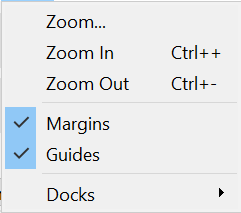
Figure 19 The View Menu On Windows
The View | Zoom… menu option brings up a simple dialog you can use to set the current zoom setting. The application uses information reported by the operating system to determine the screen DPI settings. A Zoom setting of 100% will display the document view at the same scale as you would see when printed. A zoom setting of 200% would render the document view at 2× times the size of what you would see when printed, etc.
Note
In some cases, such as when using RDP on Windows, the operating system may not report the screen DPI settings correctly. This may cause content to be rendered at an incorrect scale.
Note
You may run into scaling issues when running the application on a computer with multiple screens with different DPI settings. If needed, you can force specific DPI settings using the Application Preferences Dialog. For details, see section The Application Preferences Dialog.
The View | Zoom In menu option will increase the zoom settings for the current document view.
The View | Zoom Out menu option will decrease the zoom settings for the current document view.
You can use the Zoom | Margins menu option to highlight page margins in the current document view.
You can use the Zoom | Guides menu option to display guide lines around the usable portion of pages within the current document view.
You can use the Zoom | Docks submenu to show or hide dock windows provided by the application. Clicking on the name of the dock in the submenu will toggle the dock between its visible and hidden setting. The Zoom | Docks | Reset to default menu option will restore all docks to the application default setting.
Insert Menu
The Insert Menu, shown in Figure 20, provides functions you can use to insert content into your document. The Insert Menu contains a number of submenus.

Figure 20 The Insert Menu On Windows
You can use the Insert | Table… menu option to insert a table into the
document at the cursor. Selecting this option will bring up the Insert Table
dialog shown in Figure 21. Clicking on the advanced
settings button ( ), will display the advanced
settings you can use to control column widths, line styles, and cell gutter
settings as shown in Figure 22.
), will display the advanced
settings you can use to control column widths, line styles, and cell gutter
settings as shown in Figure 22.
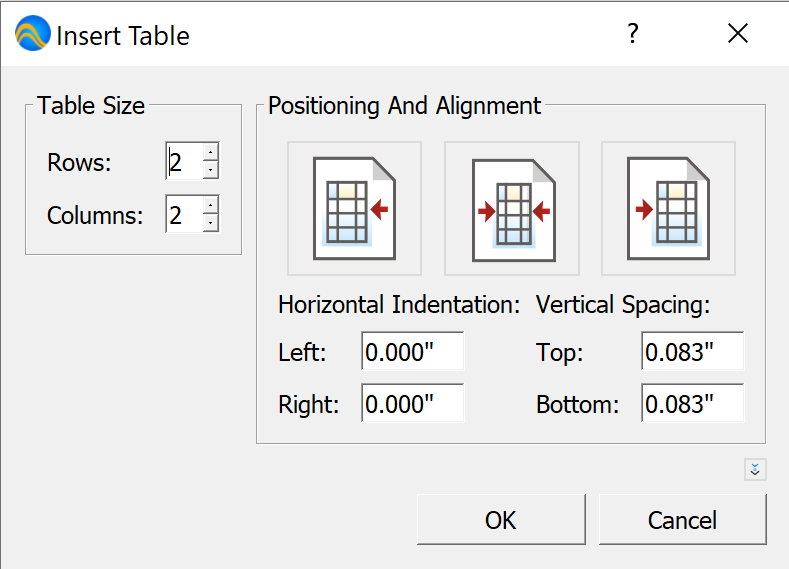
Figure 21 The Insert Table Dialog On Windows
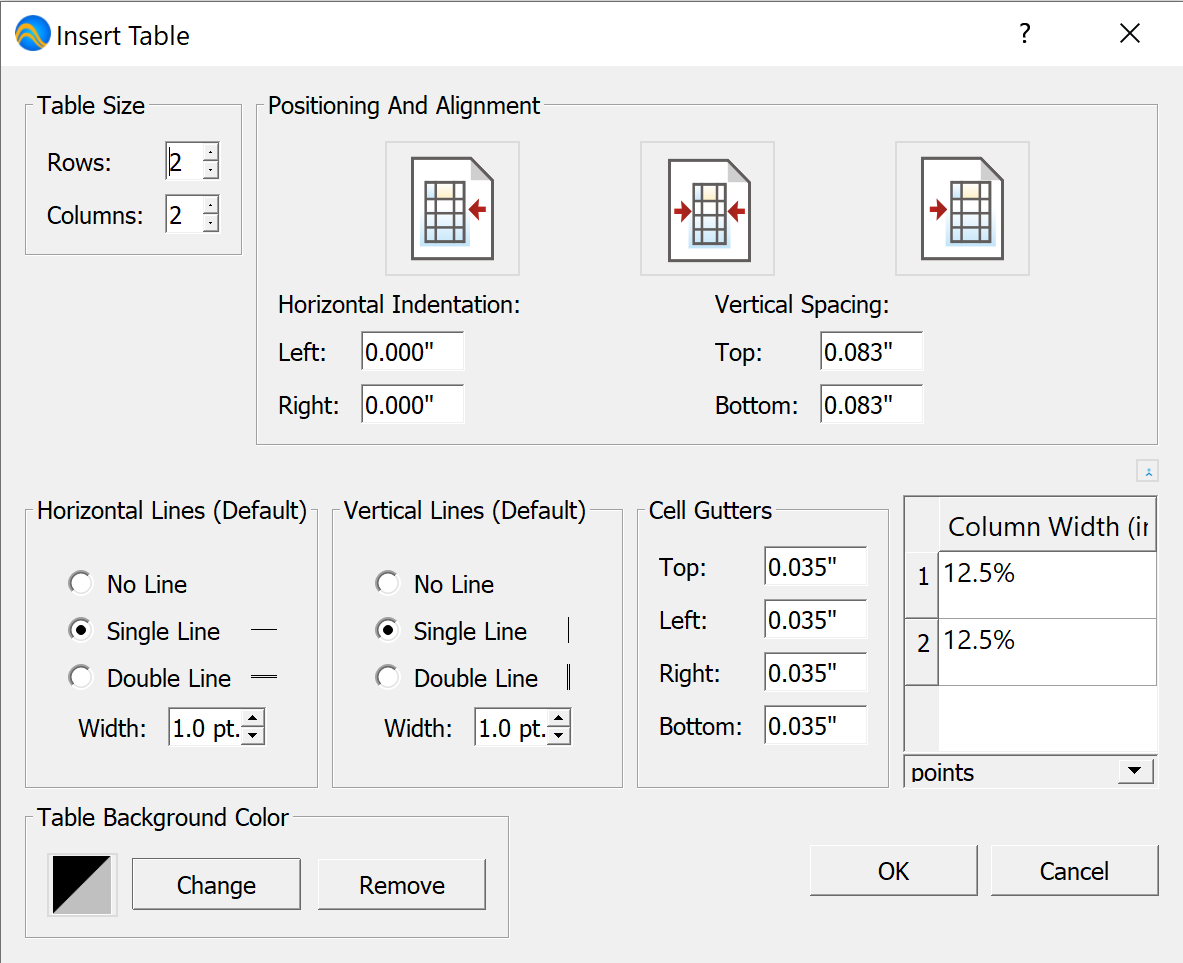
Figure 22 The Insert Table Dialog With Advanced Controls Enabled
You can use the Insert | Page Break menu option to insert a page break into the document at the cursor.
You can use the Insert | Image menu option to insert an image into the document at the cursor. Clicking on this menu option will bring up a file open dialog allowing you to select the desired image. Most common image formats are supported.
You can use the Insert | Plot menu option to insert plots into the document at the cursor. Plots will be generated using data calculated by your algorithm or model. For details on plotting, see Fields And Plotting.
You can use the Insert | Field… menu option to insert a field into the document at the cursor. Fields will be populated with numeric values calculated by your algorithm or model. For details on fields, see Fields And Plotting.
You can use the Insert | Basic Math submenus to insert basic math operators and standard constants into your document. See The Insert | Basic Math Submenus for details.
You can use the Insert | Sets & Logic submenus to insert set, relational, and boolean operators and values. For details, see The Insert | Sets & Logic Submenus.
You can use the Insert | Matrix submenus to insert matrices and matrix operators. Note that many normal operators also operate on matrices. For details, see The Insert | Matrix Submenu.
You can use the Insert | Control Flow submenus to insert special operators used to develop complex algorithms. This includes iteration operators, operation grouping operators and conditional operators. For details, see The Insert | Control Flow Submenu.
The Insert | Basic Math Submenus
The Insert | Basic Math submenu, shown in Figure 23, can be used to insert the most commonly used operators as well as a number of common special values.
You should refer to Developing Your Algorithm for details on how to best use all of the provided operators.
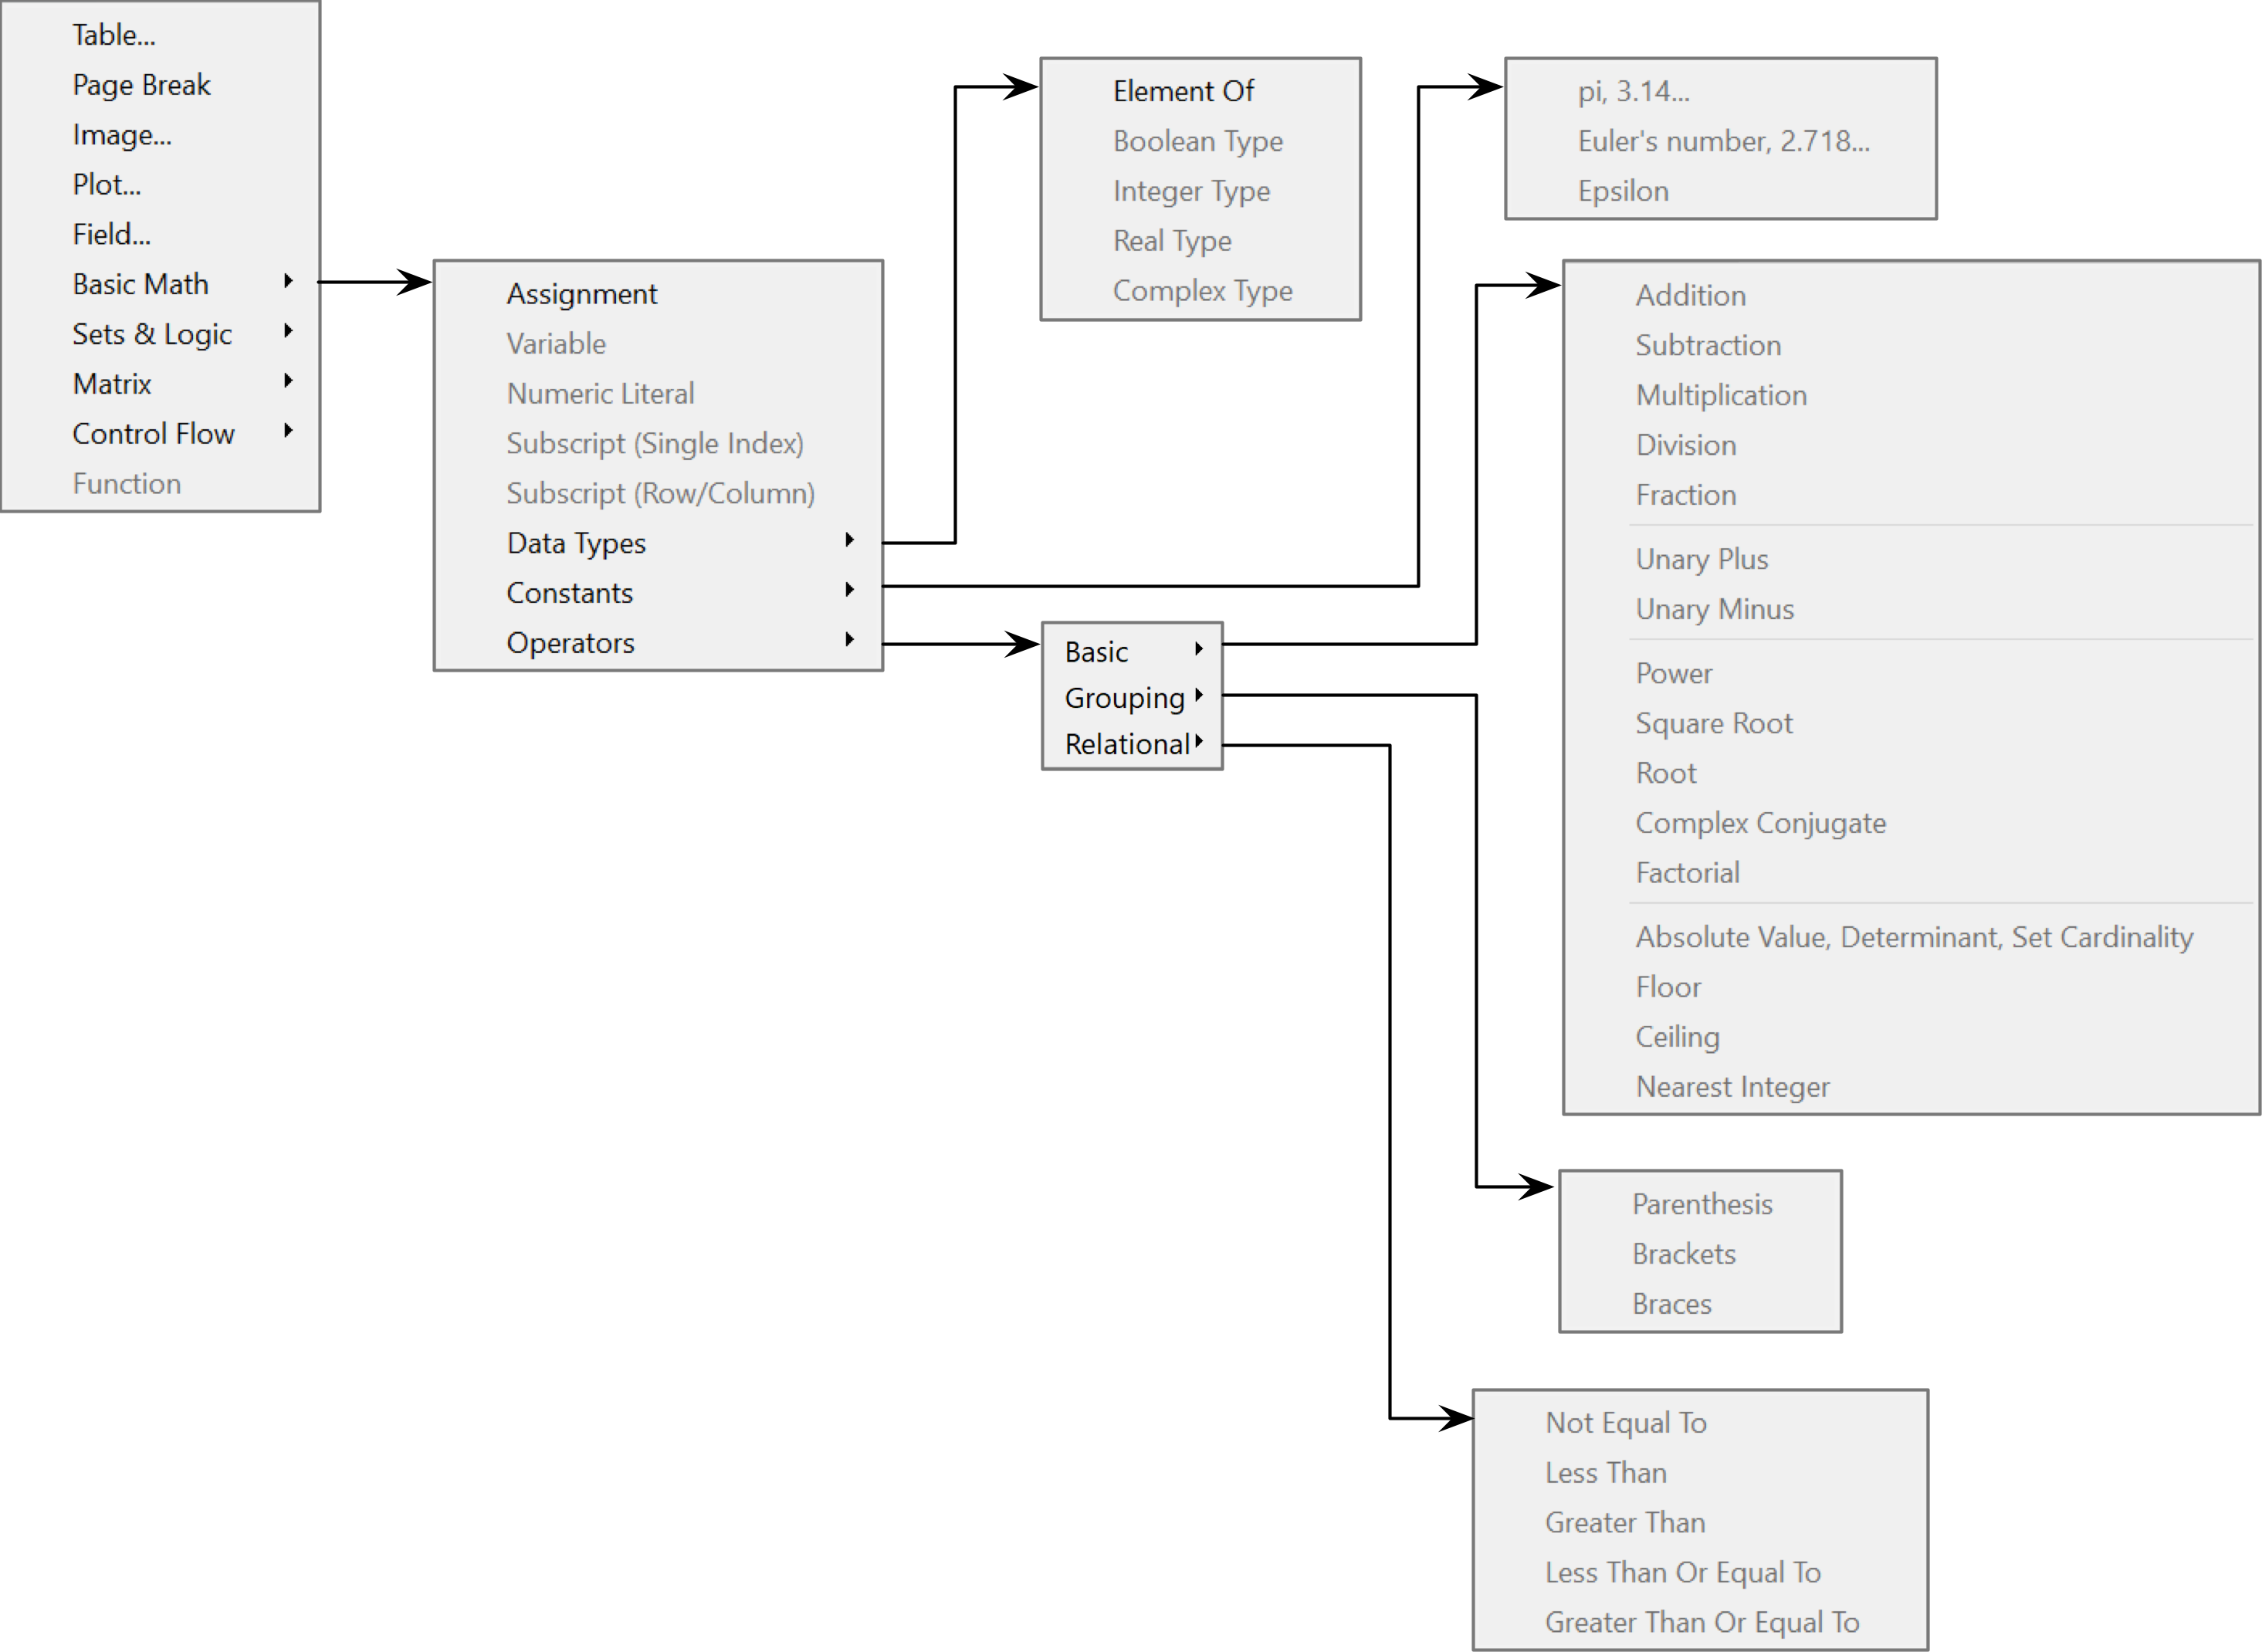
Figure 23 The Insert | Basic Math Submenus
The Insert | Sets & Logic Submenus
The Insert | Sets & Logic submenu, shown in Figure 24, can be used to insert operators and special values specific to set and boolean operations.
You should refer to Developing Your Algorithm for details on how to best use all of the provided operators.
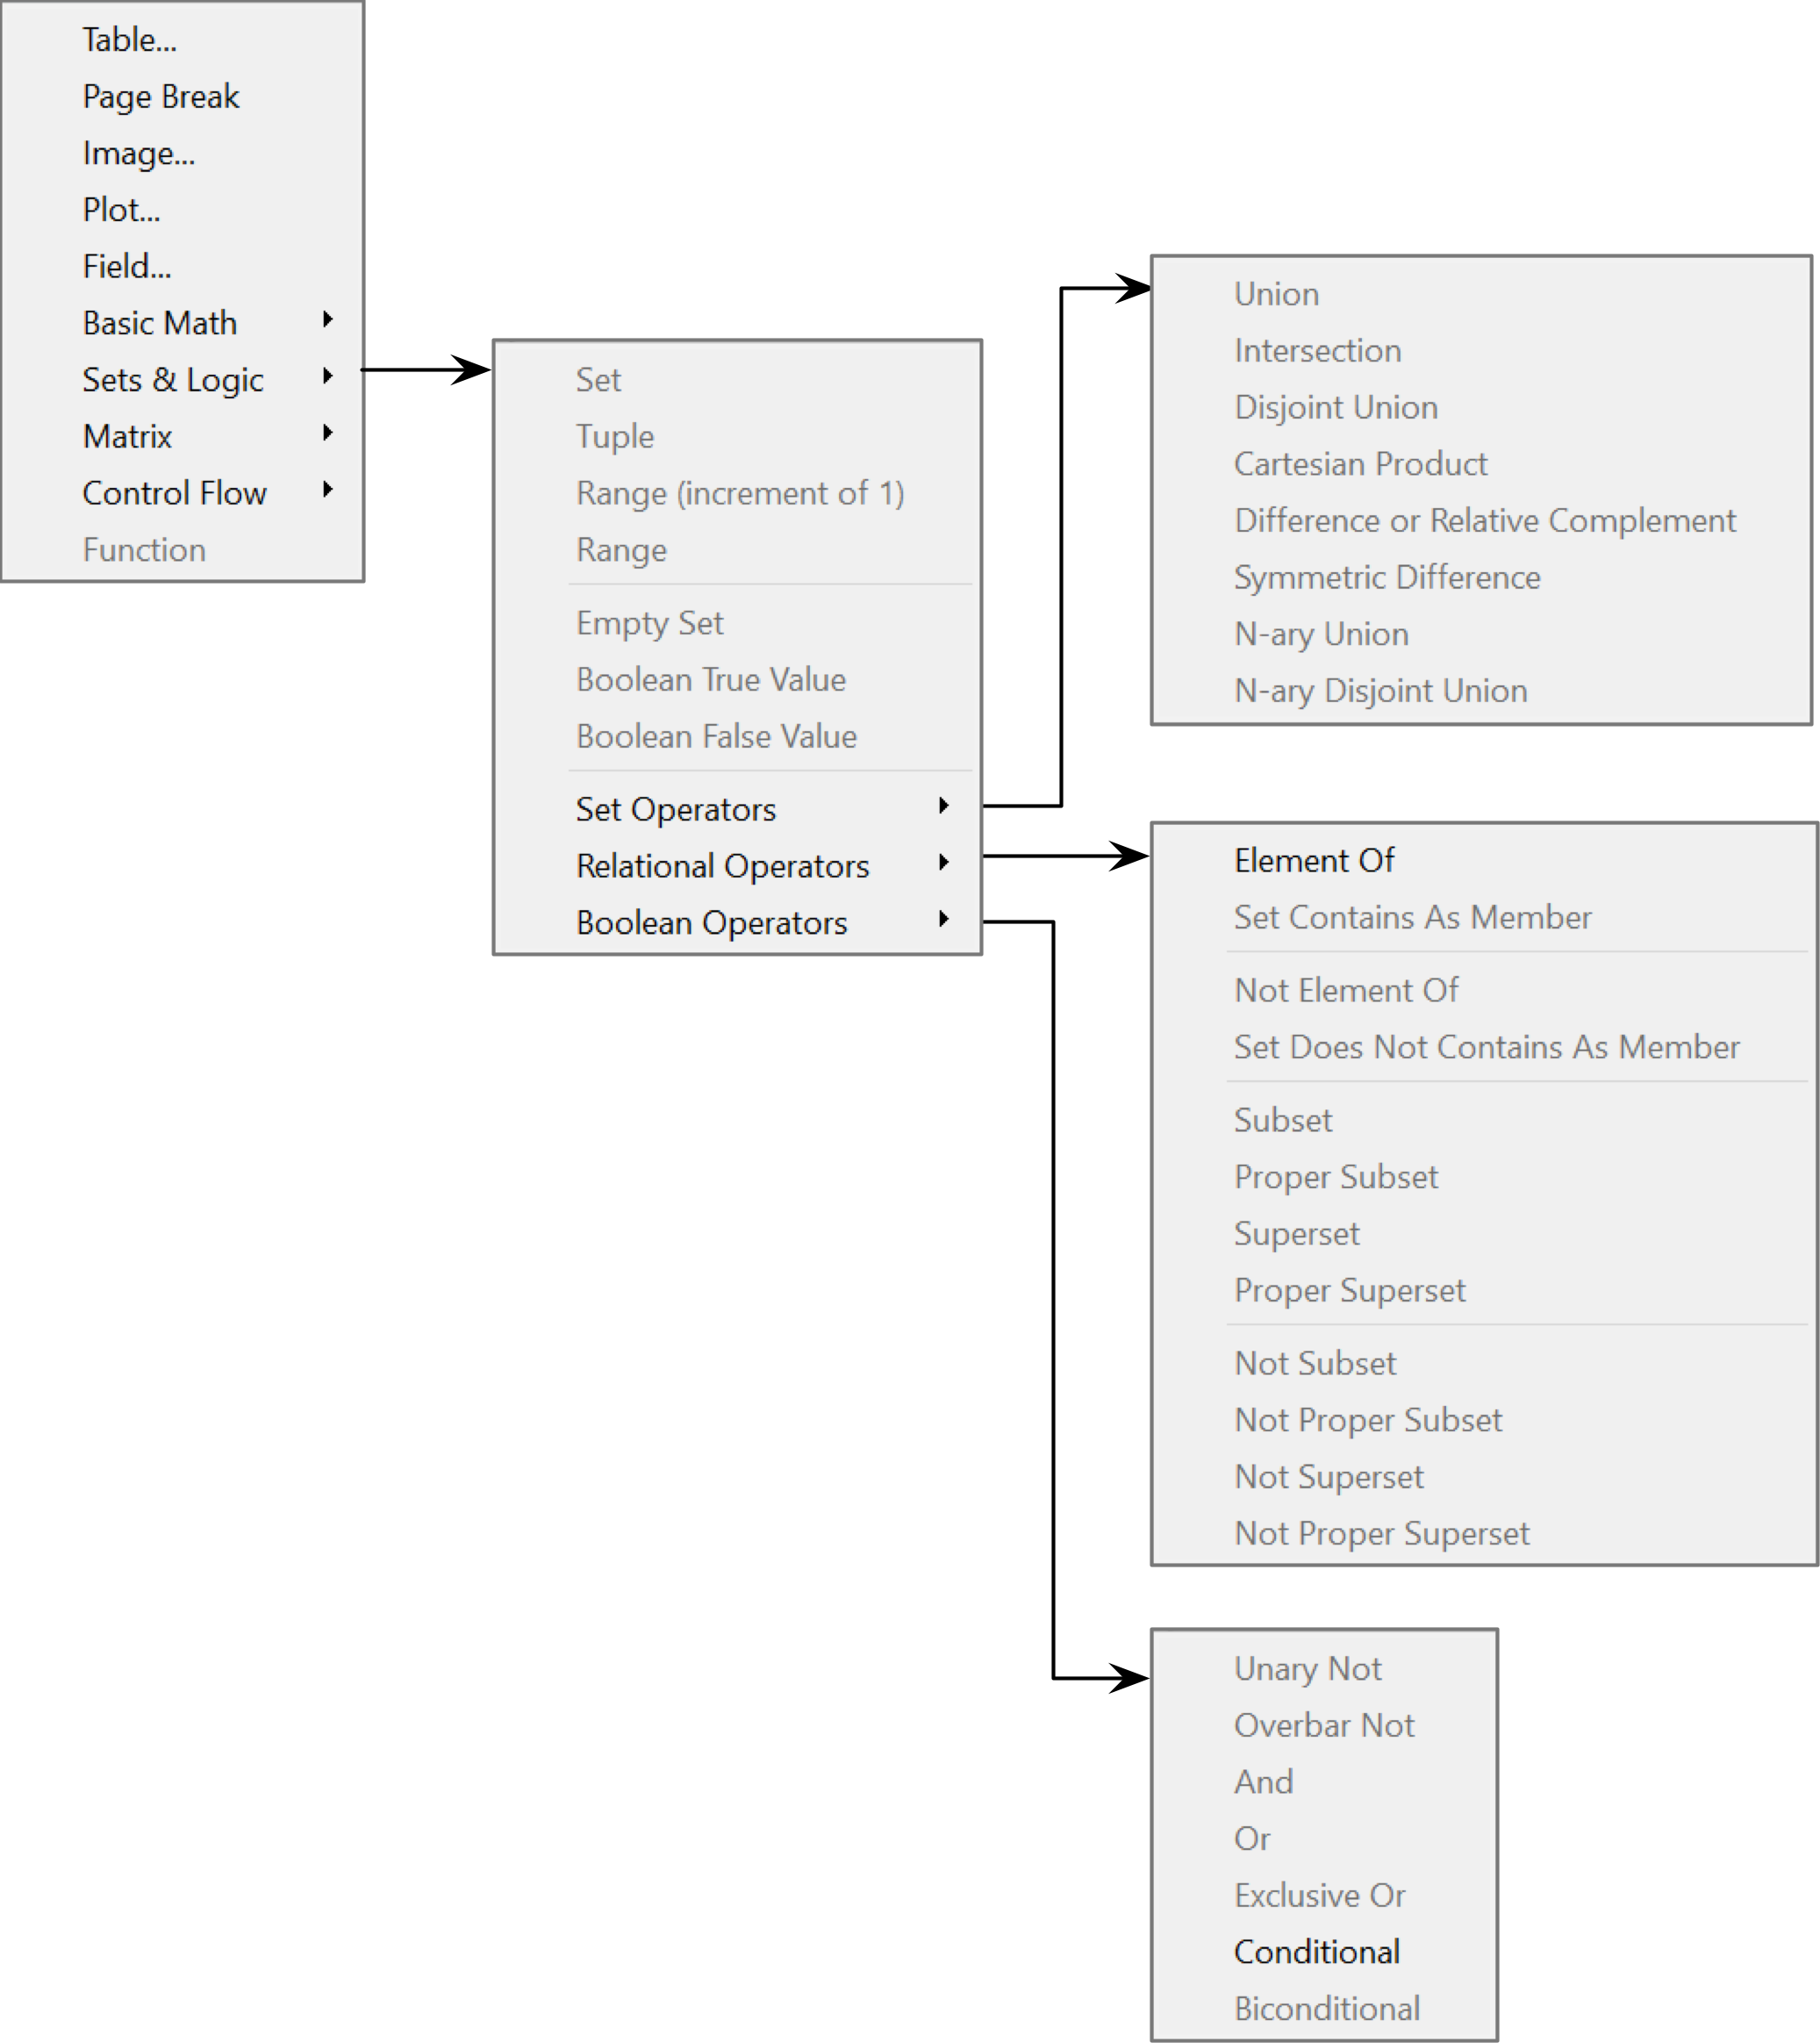
Figure 24 The Insert | Sets & Logic Submenus
The Insert | Matrix Submenu
The Insert | Matrix submenu, shown in Figure 25, can be used to insert matrix specific operators.
You should refer to Developing Your Algorithm for details on how to best use all of the provided operators.
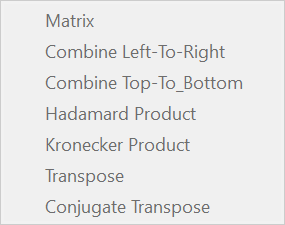
Figure 25 The Insert | Matrix Submenu
The Insert | Control Flow Submenu
The Insert | Matrix submenu, shown in Figure 26, can be used to insert operators that support iteration, grouping of expressions, and conditional evaluation of expressions.
You should refer to Developing Your Algorithm for details on how to best use all of the provided operators.
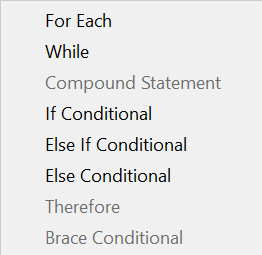
Figure 26 The Insert | Control Flow Submenu
Format Menu
The Format Menu, shown in Figure 27, provides functions you can use to change the appearance and, in a few cases, the behavior of your algorithm or model. Note that the Format Menu contains a number of smaller submenus.
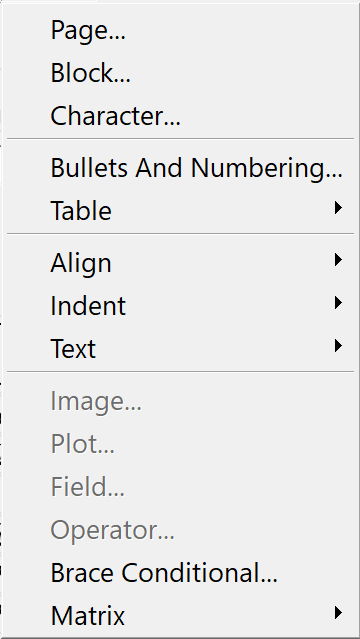
Figure 27 The Format Menu On Windows
You can use the Format | Page.. menu option to change the size, orientation, and margins of the current page or selected pages. Selecting this option will bring up the Page Format dialog shown in Figure 28.
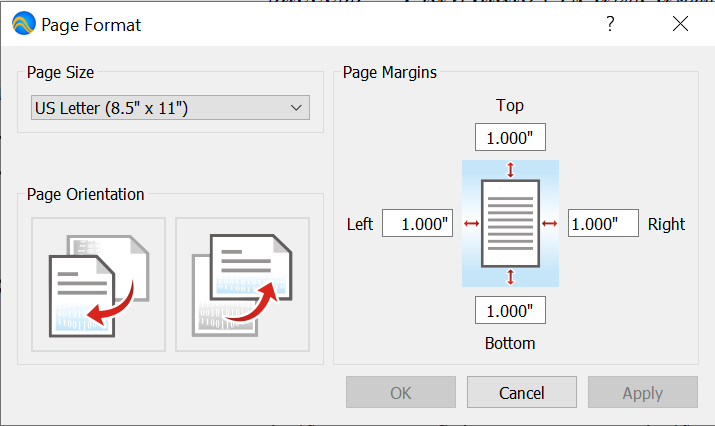
Figure 28 The Page Format Dialog
You can use the Format | Block… menu option to change the paragraph alignment, indentations, top and bottom spacing, and line spacing. Selecting this option will bring up the Block Format dialog shown in Figure 29.
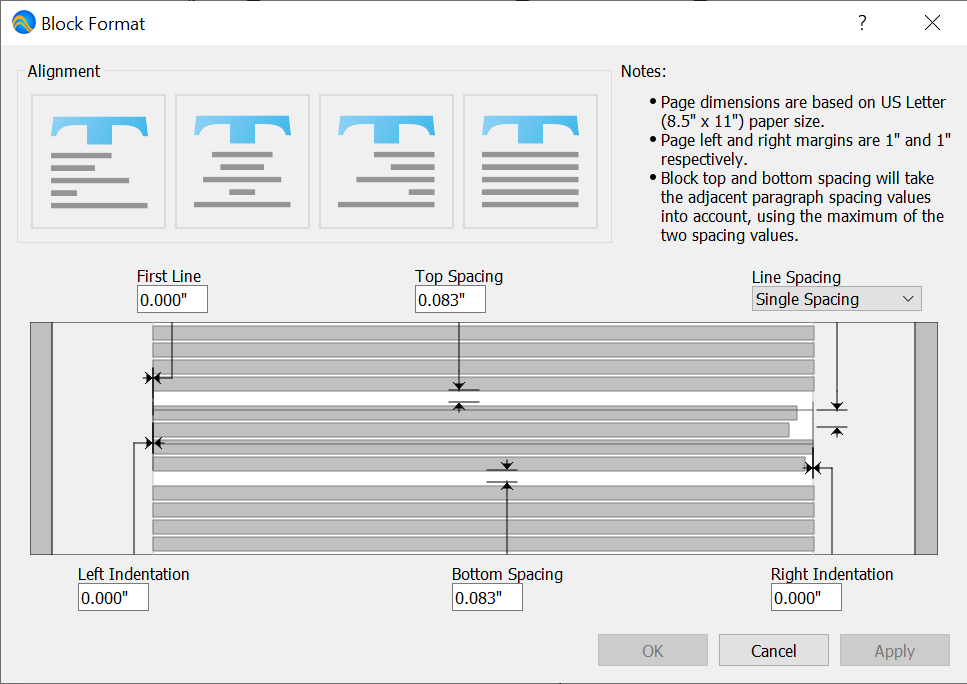
Figure 29 The Block Format Dialog
You can use the Format | Character… menu option to change the current font settings, including font color, and highlighting. The menu option can be used to adjust the selected text, or if no text is selected, for newly entered text. You can also use the Format | Character… menu option to change the font used for math elements. Figure 30 shows the Character Format dialog.

Figure 30 The Character Format Dialog
You can use the Format | Bullets And Numbering… menu option to add bullets or numbers to a paragraph, change the style of bullets or numbers, or to restart numbering. Combining the capabilities of this menu option with the Block Format dialog, shown in Figure 29, allows you to create complex nested ordered or unordered lists. Selecting the Format | Bullets And Numbering… menu option will bring up the List Format dialog shown in Figure 31.
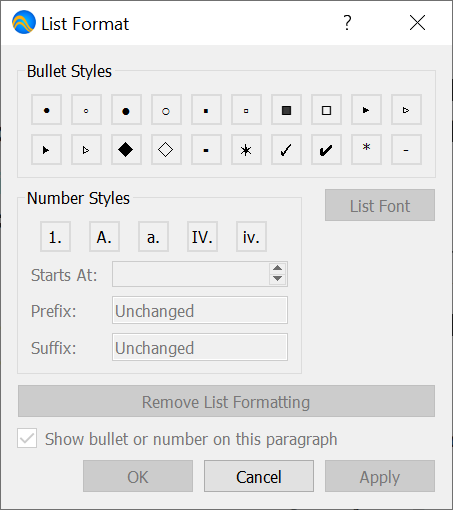
Figure 31 The List Format Dialog
The Format | Table submenu contains a large number of additional operations related to controlling the appearance of tables. For details, see The Format | Table Submenus.
The Format | Align submenu provides a small number of menu options allowing you to quickly change the alignment of paragraphs. For details, see The Format | Align Submenu
The Format | Indent submenu provides two menu options allowing you to rapidly change paragraph indentation. For details, see The Format | Indent Submenu.
The Format | Text submenu provides a number of menu options allowing you to rapidly change text embellishments, including color and highlighting. For details, see The Format | Text Submenus.
The Format | Image menu option allows you to change the scale and orientation of images within your document. Selecting this menu option will bring up the Image Format dialog shown in Figure 32.
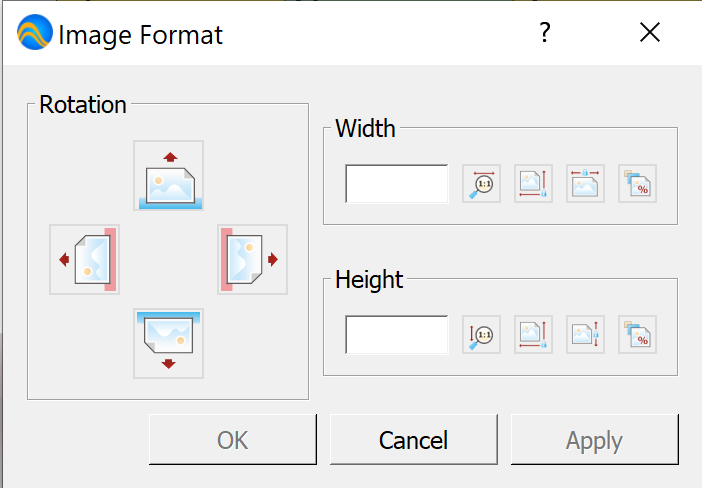
Figure 32 The Image Format Dialog
The Format | Plot menu option allows you to change the appearance of plots within your document. Selecting this menu option will bring up the Plot Format dialog shown in Figure 33.
For details regarding plotting, see Section Fields And Plotting.
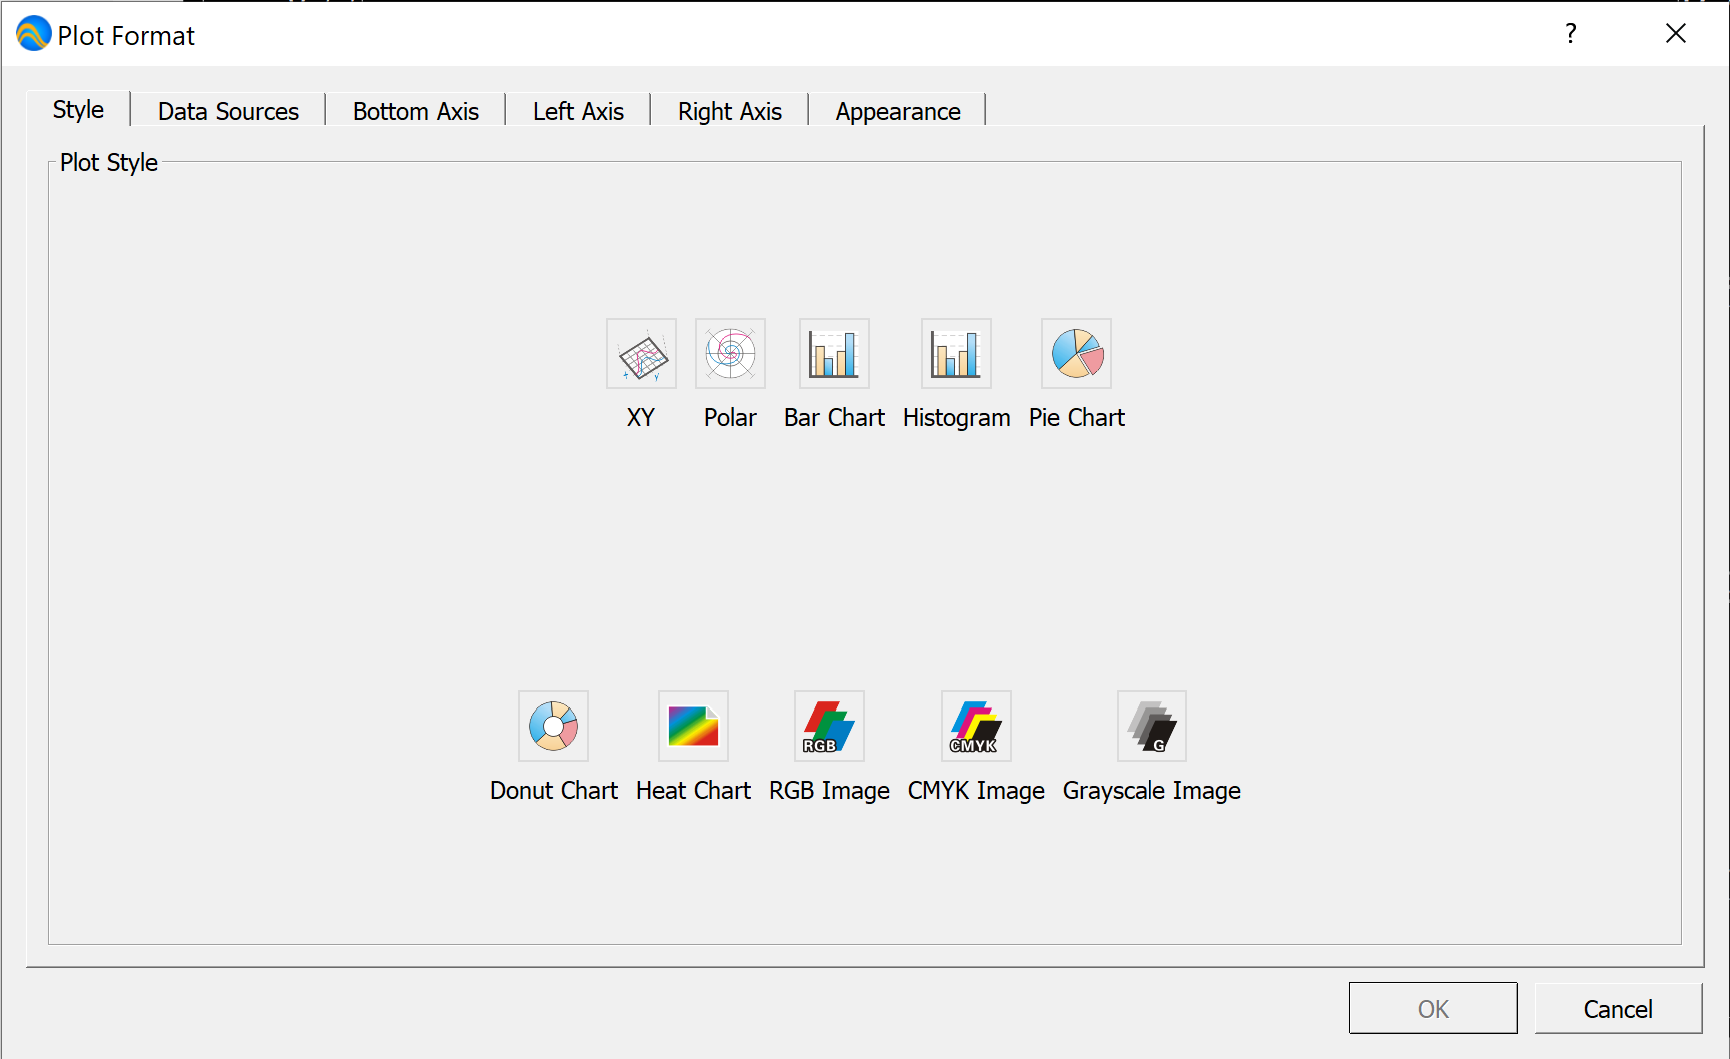
Figure 33 The Plot Format Dialog
The Format | Field menu option allows you to change the appearance of numeric fields within your document. Selecting this menu option will bring up the Field Format dialog shown in Figure 34.
For details regarding plotting, see Section Fields And Plotting.
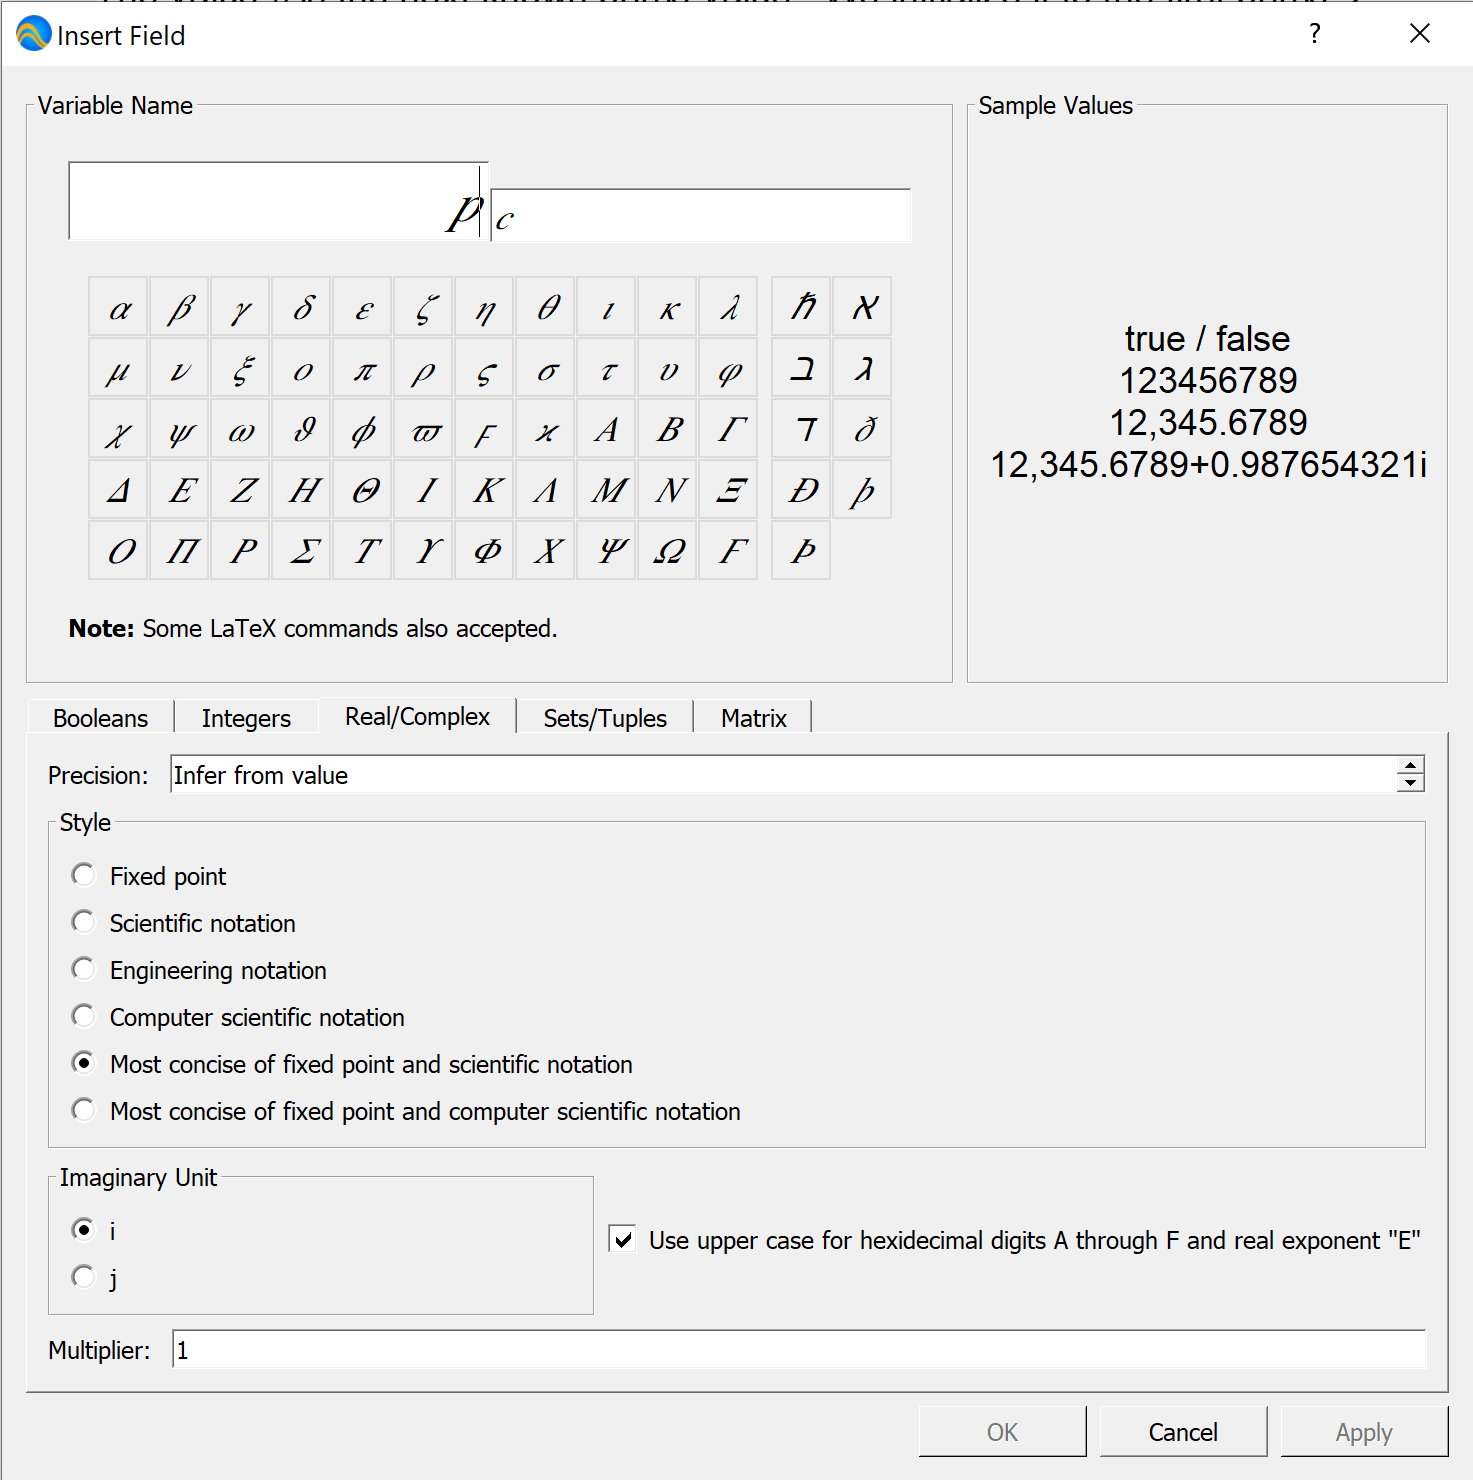
Figure 34 The Field Format Dialog
The Format | Operator menu option allows you to change the appearance of common operators, force parenthesis around operators (thus also changing order of operations), etc. Selecting this menu option will bring up the Operator Format dialog.
The appearance of the Operator Format dialog will change based on the currently selected operator(s). Figure 35 shows an example of this dialog when applied to a multiplication operator.
For details on using operators, see Section Developing Your Algorithm.
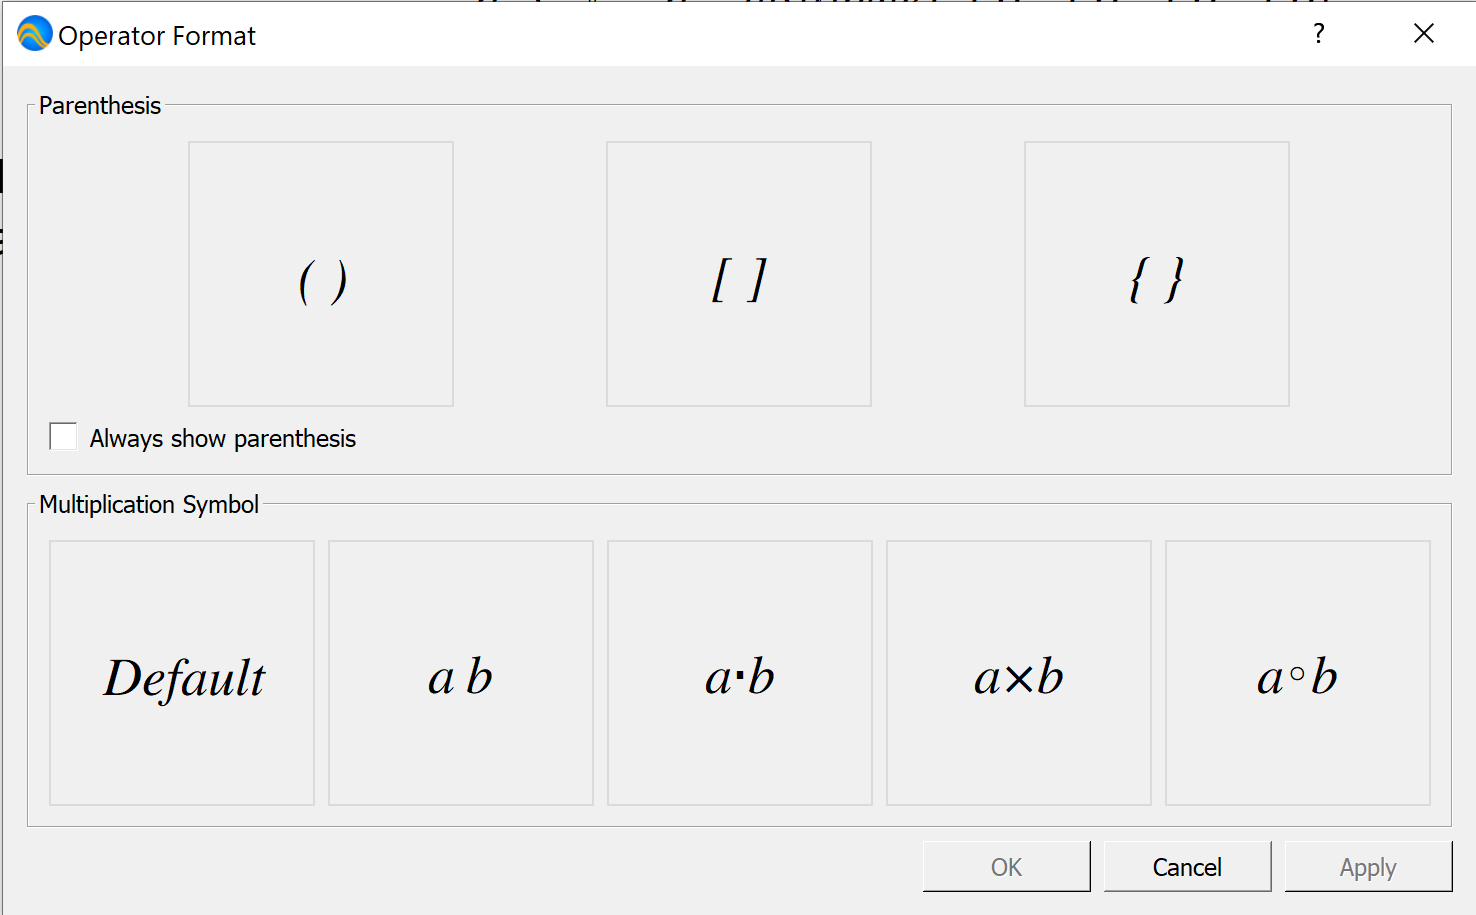
Figure 35 The Operator Format Dialog
The Format | Brace Conditional menu option allows you to modify the appearance of brace conditional or case operators as well as add and remove additional conditions or cases. Selecting this menu option will bring up the Modify Brace Conditional dialog as shown in The Modify Brace Conditional Dialog.
For details on using brace conditionals, see Section Developing Your Algorithm.

Figure 36 The Modify Brace Conditional Dialog
The Format | Matrix submenu allows you to add and remove rows and columns from a matrix. For details, see The Format | Matrix Submenus.
On MacOS, the Format menu also includes the Format Document Preferences… menu option. This menu option is the same as the Tools | Document Preferences… menu option on the Windows and Linux versions of Aion. For details, see Tools Menu.
The Format | Table Submenus
The Format | Table submenus, shown in Figure 37 provides a large number of options you can use to adjust the look of tables.
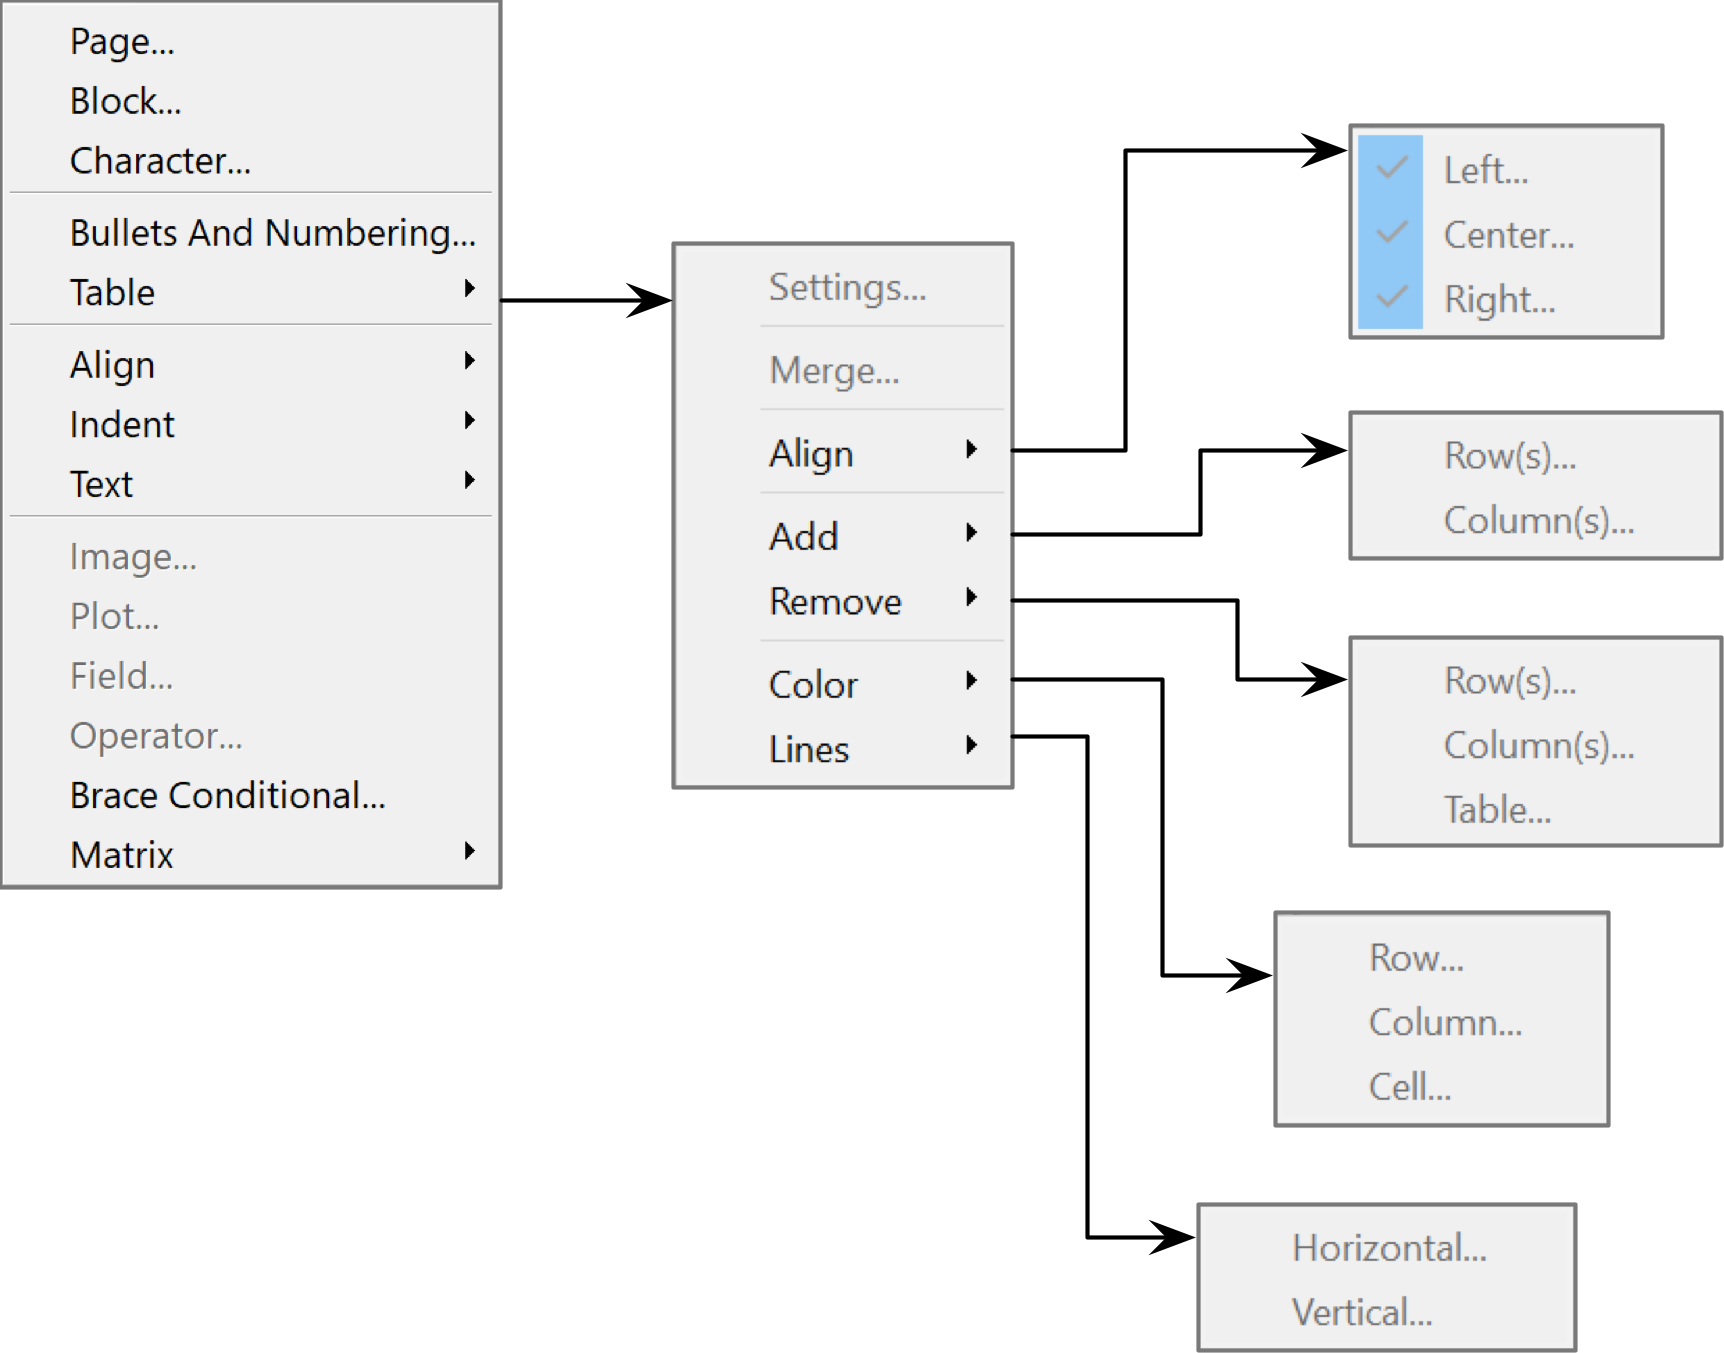
Figure 37 The Format | Table Submenus
The Format | Settings… menu option will bring up a dialog very similar to the *Insert Table dialog shown in Figure 21 and Figure 22. You can use this dialog to adjust the overall appearance of the table, including column widths and placement.
The Format | Table | Merge… menu option will bring up a small dialog allowing you to merge table cells together into a single larger cell occupying multiple rows and/or columns. When the cursor is placed on merged cells, this menu option will change to Format | Table | Unmerge, allowing you to unmerge previously merged cells.
The Format | Table | Align submenu allows you to align the table across the page, either left justified, centered, or right justified.
The Format | Table | Add submenu allows you to add rows or columns to the table at the selected cursor position. Selecting this menu option will bring up a dialog allowing you to specify the number of rows or columns to be added as well as the relative position of the newly added content.
The Format | Table | Remove submenu allows you to remove rows or columns. Selecting this option will bring up a dialog allowing you to specify the number of rows or columns to be removed as well as the relative position of the rows or columns to be removed. The Format | Table | Remove | Table… menu option will remove the entire table.
The Format | Table | Color submenu allows you to change the color used for individual rows, columns, or cells. Selecting any of these options will bring up a dialog allowing you to pick the desired color. Note that the row, column, and cell colors will be blended.
The Format | Table | Lines submenu allows you to specify the line style and color for row lines and column lines. Selecting any of these options will bring up a dialog allowing you to specify the line style, weight, and line color for the lines bordering a given cell.
Note
Changing row lines or column lines will change the line across the entire length of width of the table. There is currently no support for changing the line settings on individual cells.
Note
Due to limitations in LaTeX, complex vertical lines in tables may not be rendered correctly in exported LaTeX output.
The Format | Align Submenu
The Format | Align submenu, shown in Figure 38 allows you to change the alignment of paragraphs and tables. Paragraphs can be left aligned, centered, right aligned or justified across the page margins.
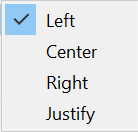
Figure 38 The Format | Align Submenu
The Format | Indent Submenu
The Format | Indent submenu, shown in Figure 39 allows you to quickly add or remove indentation from a paragraph or table. Indentation will be increased or decreased by ¼” each time one of these menu options are selected.
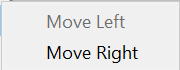
Figure 39 The Format | Indent Submenu
The Format | Text Submenus
The Format | Text submenus, shown in Figure 40, allows you to rapidly add or remove embellishments from text as well as change text color and highlighting.
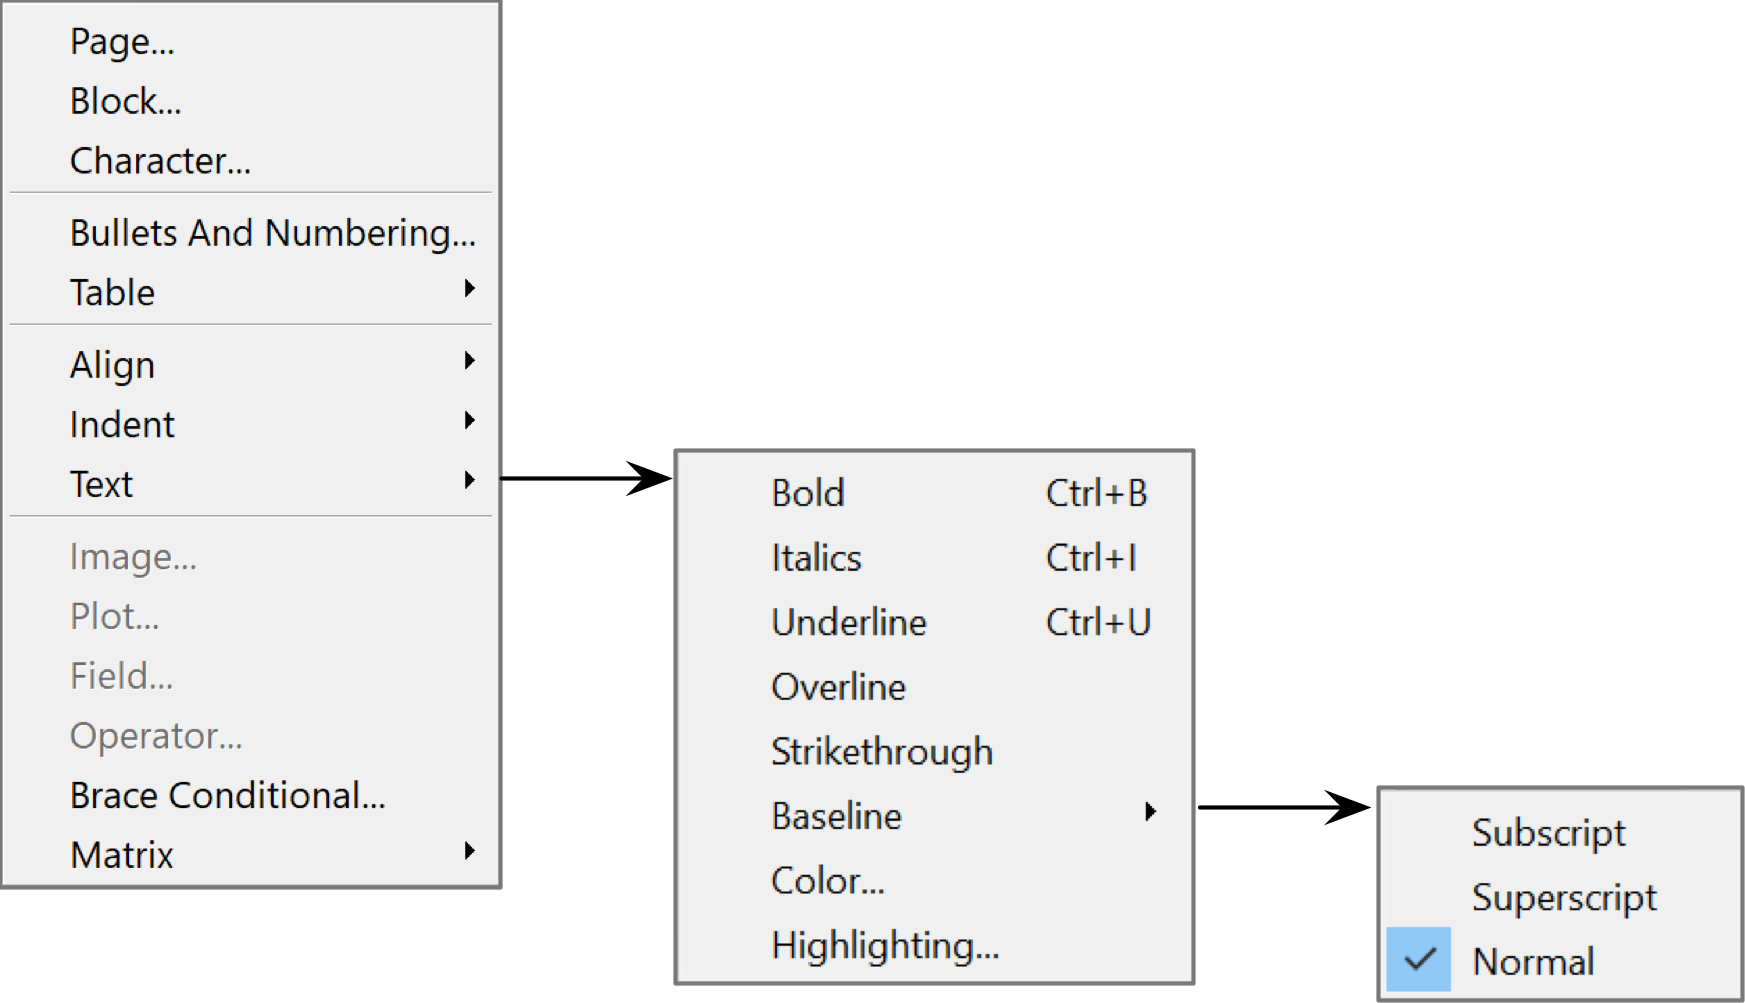
Figure 40 The Format | Text Submenus
Most of the options should be self explanatory. The Format | Text | Color… and Format | Text | Highlighting… menu options will bring up a dialog you can use to select the font foreground and background colors respectively.
The Format | Matrix Submenus
The Format | Matrix submenus, shown in Figure 41, allows you to easily add or remove rows or columns from a matrix element.
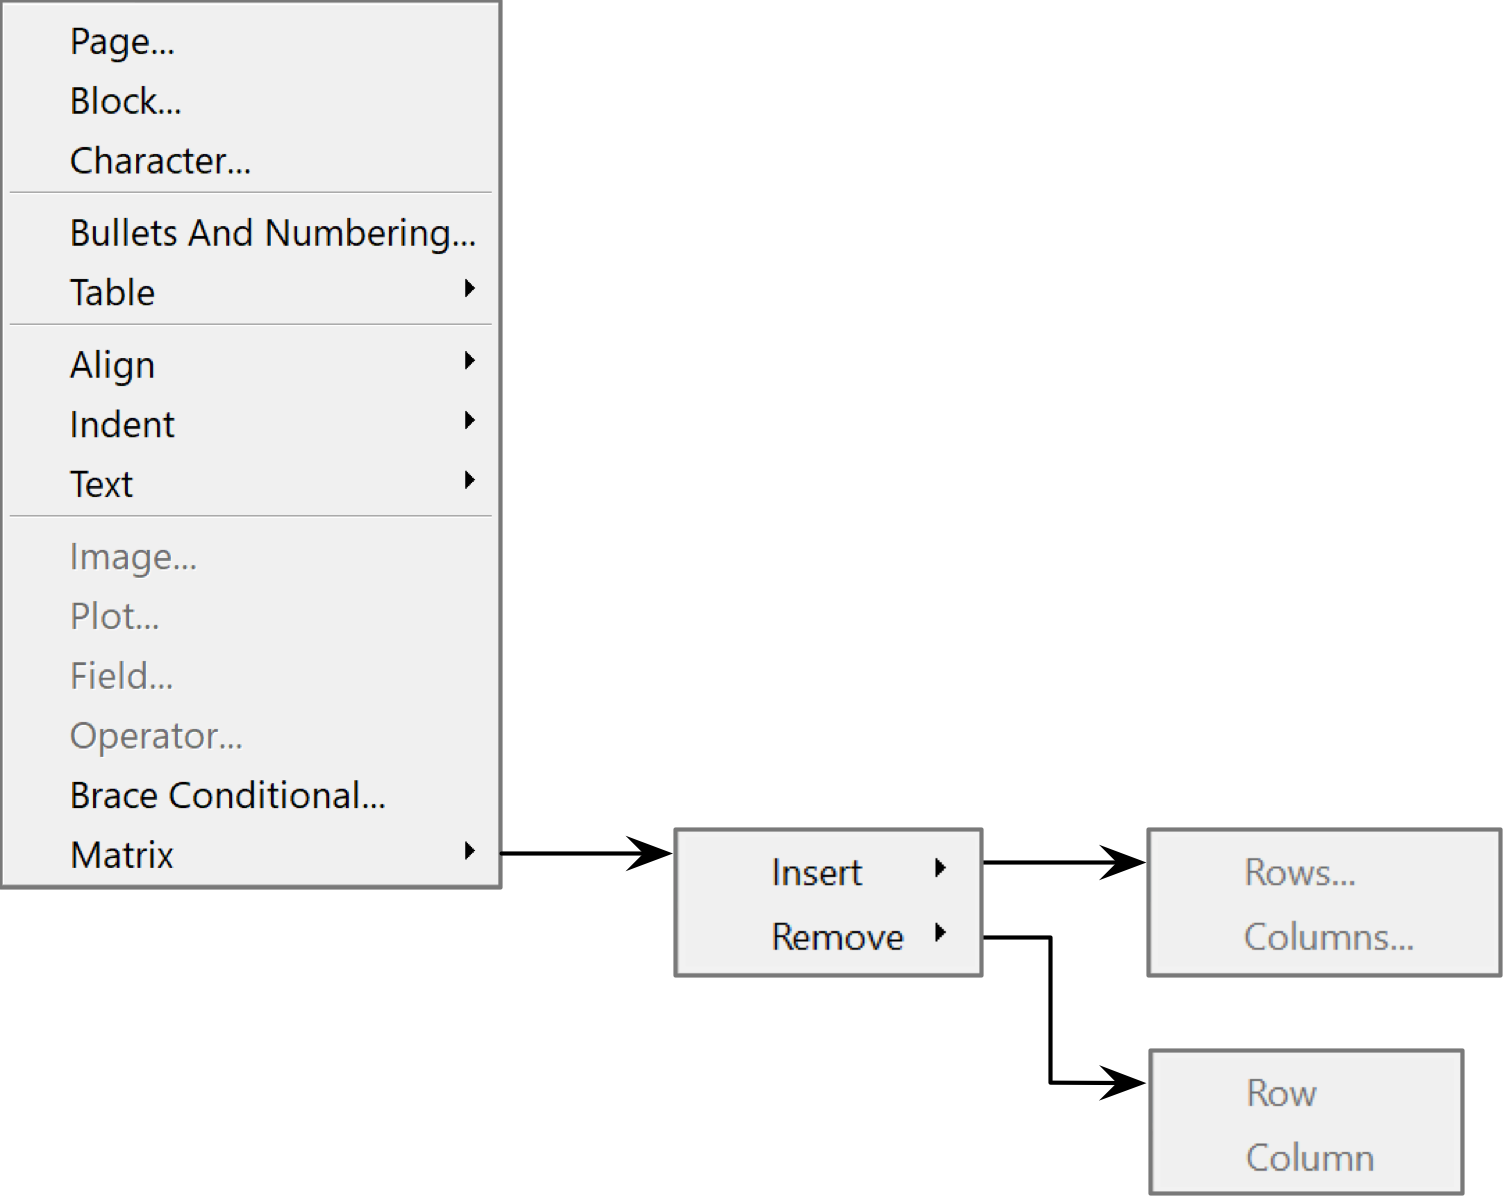
Figure 41 The Format | Matrix Submenus
Selecting Format | Matrix | Insert | Rows… or Format | Matrix | Insert | Columns… will bring up a dialog allowing you to specify the number of rows or columns to insert as well as whether the rows/columns should precede or follow the current location.
Selecting Format | Matrix | Remove | Row or Format | Matrix | Remove | Column will remove a single row or column respectively.
Debug Menu
The Debug menu, shown in Figure 42 can use used when developing and testing your algorithm or model to run the model within Aion, to watch and identify issues in the model, and inspect and change the current value of variables. Most of the options available in this menu are also available through the Right Click Menu discussed in Right Click Menu.
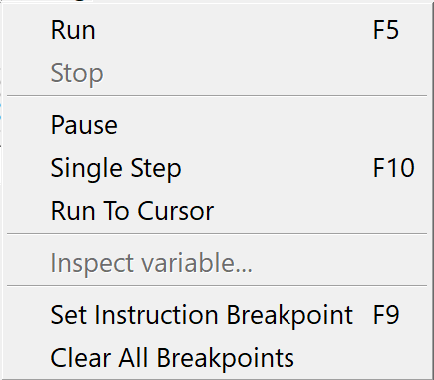
Figure 42 The Debug Menu
The Debug | Run menu option will compile and run the current algorithm or
model. On Windows and Linux, you can also invoke this menu option by
pressing F5. On MacOS, you can use -y. You can also use this
menu option to resume execution of a paused model.
The Debug | Stop menu option will stop the currently running algorithm or model.
The Debug | Pause menu option will pause the currently running algorithm or model at the first available opportunity. Once your model or algorithm has been paused, you can inspect variables or set/clear breakpoints.
The Debug | Single Step menu option can be used to either start execution
and run to the first equation in your algorithm or model, or to execute a
single equation within your algorithm or model. Once executed, your model
or algorithm will pause. On Windows and Linux, you can use F10 to
perform this action. On MacOS you can invoke this menu option by pressing
-SHIFT-o.
The Debug | Run To Cursor menu option can be used to run or continue execution until the equation the cursor is currently sitting on has been reached. Execution will be paused once the model or algorithm reaches the equation the cursor is on.
The Debug | Inspect variable.. menu option can be used to examine or modify the current value of a variable, including complex variables such as matrices, sets, and tuples. You can also save or load matries to/from files using this menu option. This menu option is only available when a model or algorithm has been paused or after a model has completed execution. To use, place the cursor on a variable name and select Debug | Inspect variable…. Doing so will bring up the Inspector Dialog, shown in Figure 43. The exact look of the Inspector Dialog will change based on the contents of the variable.
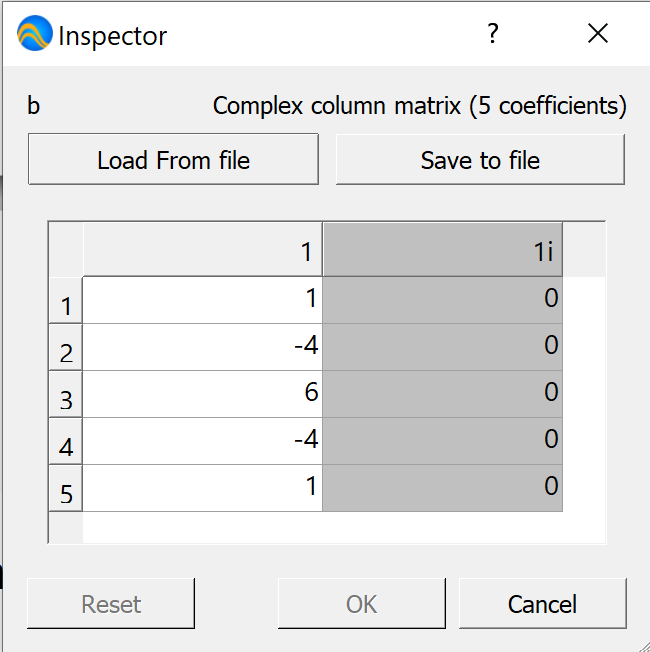
Figure 43 The Inspector Dialog
The Debug | Set Instruction Breakpoint allows you to specify or clear locations where the model or algorithm should pause during execution. You can set as many instruction breakpoints as you like. Once paused, you can resume execution or single step as desired.
The Debug | Clear All Breakpoints will remove all currently set instruction breakpoints.
Tools Menu
The Tools Menu, shown in Figure 44 is only available on Windows and Linux. On MacOS, the provided functions are available in other menus. You can use the Tools menu to set document or application global settings.

Figure 44 The Tools Menu On Windows
The Tools | Document Preferences… menu option will bring up the Document Preferences dialog. The Document Preferences dialog, shown in Figure 45, allows you to change settings that are global to the entire document, including:
The default page size, orientation, and margin settings,
The default fonts used for key elements,
The style used for brace conditional or case operators, and
The desired source of entropy and seeds to be used by your algorithm or model.
Note
The entropy source is only used when your model is executed within Aion.
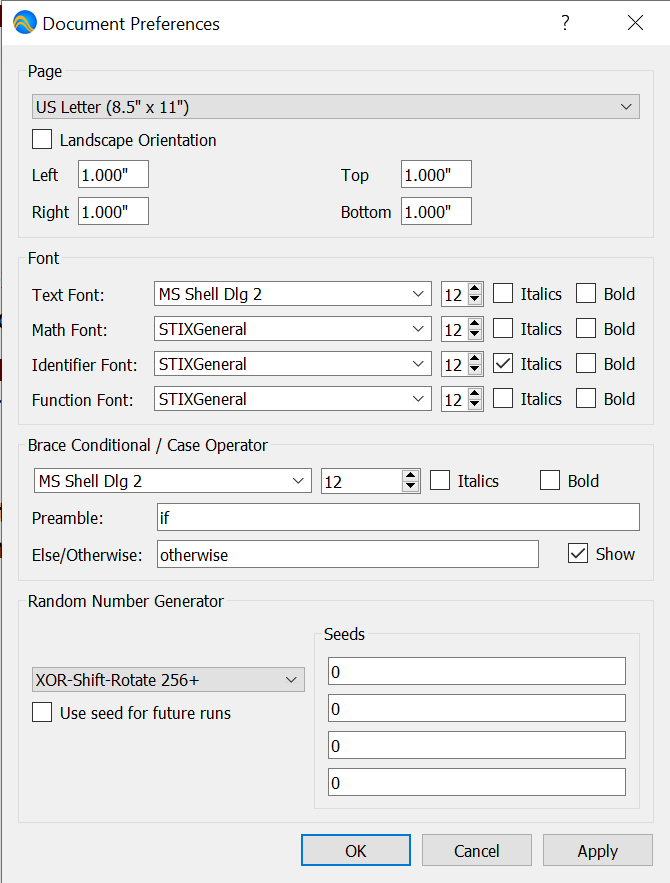
Figure 45 The Document Preferences Dialog
The Tools | Application Preferences… menu option will bring up the Application Preferences dialog. The Application Preferences dialog, shown in Figure 46, allows you to change settings that are global to the application, including default settings for newly created documents.
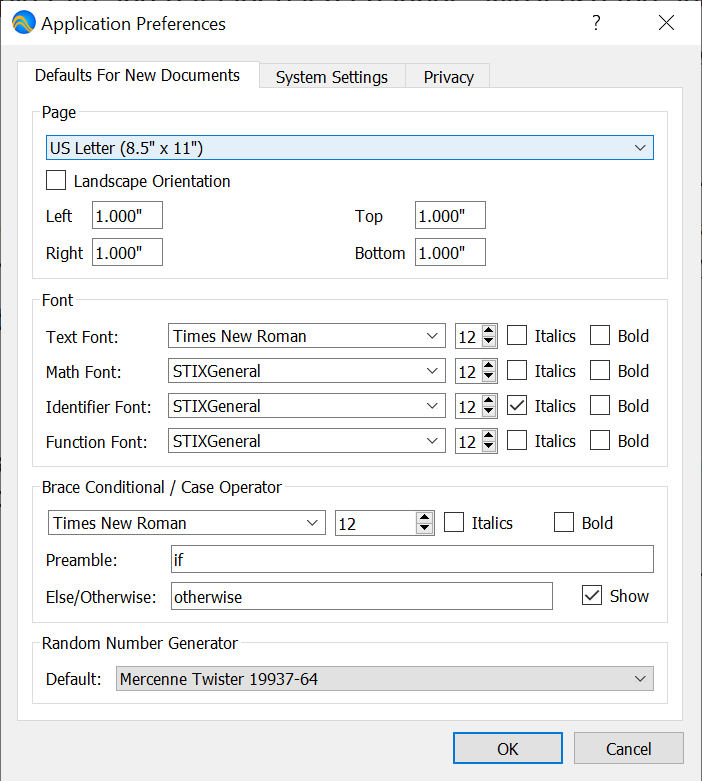
Figure 46 The Application Preferences Dialog
The Application Preferences | Defaults For New Documents tab allows you to set the defaults to be used for new documents. Changing settings under this tab will not modify existing documents.
The Application Preferences | System Settings tab allows you to force the display resolution settings for graphics and text. You can use this feature to force values should your system report incorrect DPI settings. Note that settings do not take effect until the application has been restarted.
The Application Preferences | Privacy tab allows you to enable or disable reporting of anonymized usage statistics. Inesonic, LLC uses the supplied information to better understand how our customers use Aion in order to drive continuous product improvement. For details on what data we collect, please refer to our Privacy Policy.
Window Menu
You can use the Window menu, shown in Figure 47 to open and close new Aion windows and add/remove document tabs within the current window.

Figure 47 The Window Menu
Clicking on Window | New Window will open a new Aion window containing the current document.
You can close a window by clicking on Window | Close Window. Note that Aion will prompt you if any documents are displayed only on tabs in the window being closed and those documents have unsaved changes.
You can open a new tab for a document by clicking on Window | New Tab.
Lastly, you can close a single tab by clicking on Window | Close Tab. You will be prompted If the tab is the only tab displaying a given document and the document has unsaved changes.
Help Menu
You can use the Help Menu, shown in Figure 48 to obtain useful information.
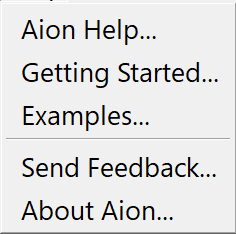
Figure 48 The Help Menu On Windows
Clicking on Help | Aion Help… will direct your browser to the Aion documentation at https://documentation.inesonic.com. You can use this menu option to quickly access the on-line documentation for Aion.
Clicking on Help | Getting Started… will direct your browser to a collection of tutorial videos.
You can use the Help | Examples… menu option to open up the examples provided as part of Aion.
You can use the Help | Send Feedback… menu option to send feedback and feature requests to Inesonic, LLC.
On Windows and Linux, you can use the Help | About Aion… menu option to obtain the current software version information, information about your current license, and information about the currently installed plug-ins.
Docks
Aion Docks are small groups of controls that provide functionality similar to tool bars or ribbon interfaces in other software packages. You can use docks to quickly access functions from the main window. Unlike tool bars or ribbon interfaces, you can relocate docks, hide or show docks, and stack docks on top of each other in order to adjust Aion to match the way you like to work. You can pick and choose the docks and place the docks in any of the four dock areas based on the position that works best for you. In addition, you can make docks float on Windows and Linux by double clicking on the dock’s title bar.
You can drag a dock to a new location by grabbing the dock’s title bar and moving the title bar to the new location. The selected dock will be repositioned at the new location. If you drag one dock on top of another dock, you can stack docks together. Once stacked, select the desired dock by clicking on the tab with the dock’s name. You can remove a dock from a stack simply by grabbing the dock by its title bar and dragging it to the new location.
When docks are dragged to a new position, such as from the top dock area to the left dock area, they will re-orient in order to better operate in their new position. The available controls remain the same but their positions in the dock will shift in order to make use the increased horizontal or vertical space. As an example Figure 49 and Figure 50 show the Home Dock in the horizontal and vertical orientations.
Aion supports a large number of different docks with only a handful made visible by default. You can enable or hide docks by selecting the dock in the View | Docks | … menu. You can also enable or hide any dock using the appropriate backslash command.
Home Dock
The Home Dock, shown in Figure 49, provides a number of common file and editing functions. The vertical orientation of the Home Dock is shown in Figure 50.
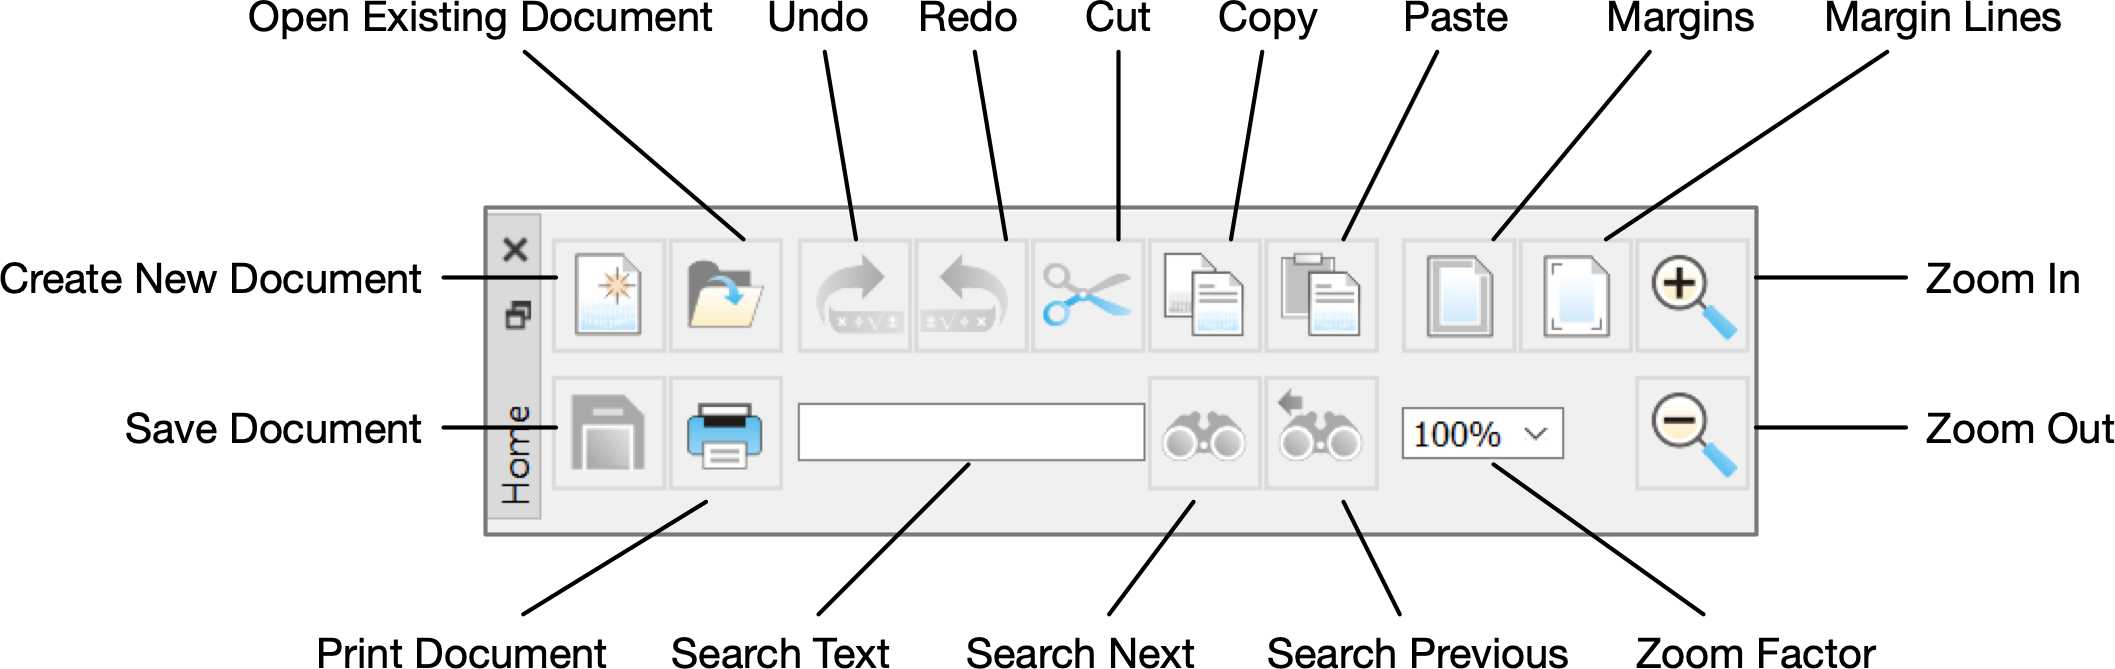
Figure 49 The Home Dock, Horizontal Orientation
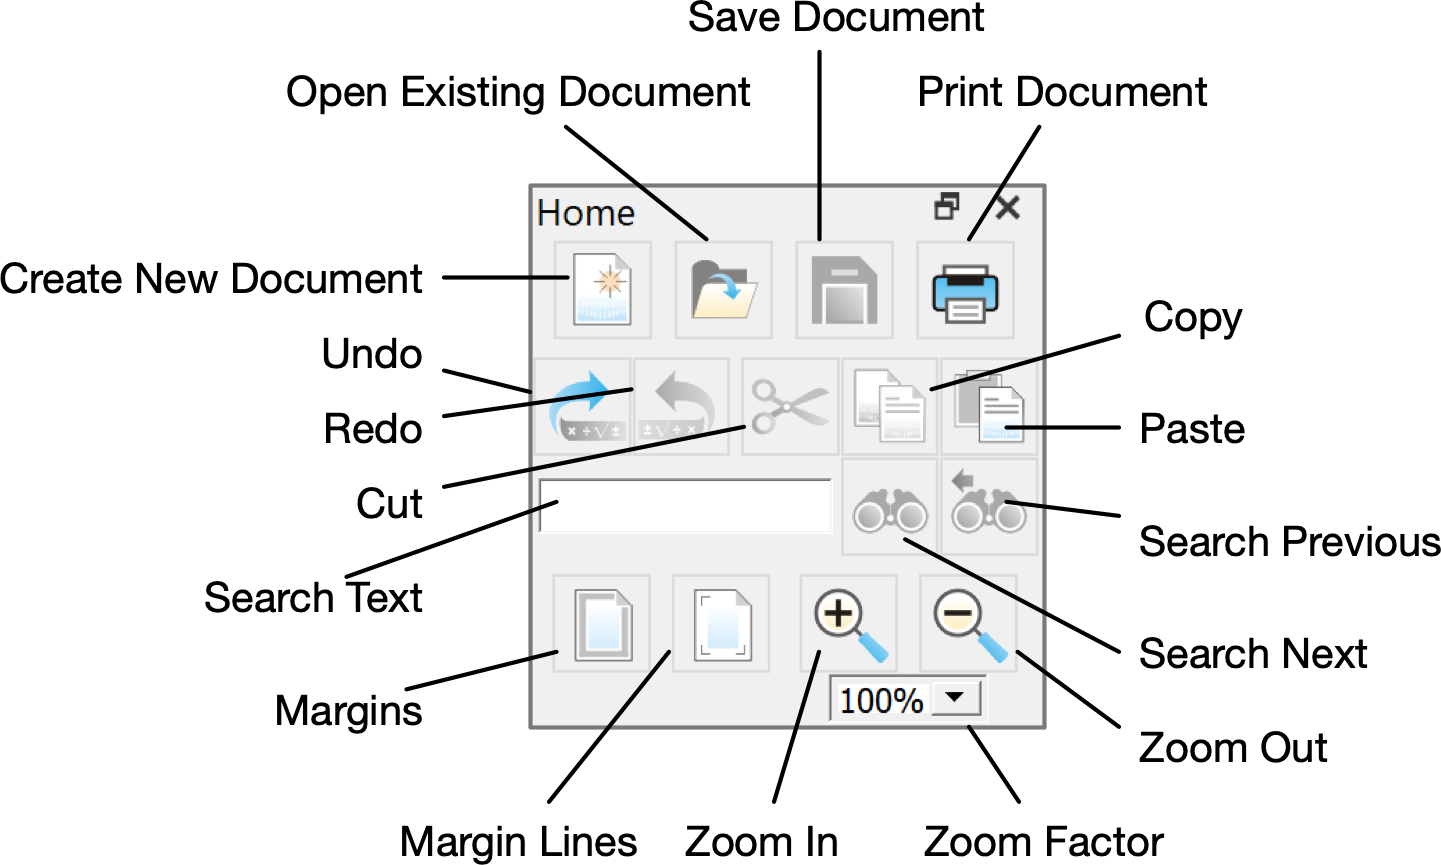
Figure 50 The Home Dock, Vertical Orientation
Insert Dock
You can use the Insert Dock, shown in Figure 51, to insert commonly used annotations and elements.
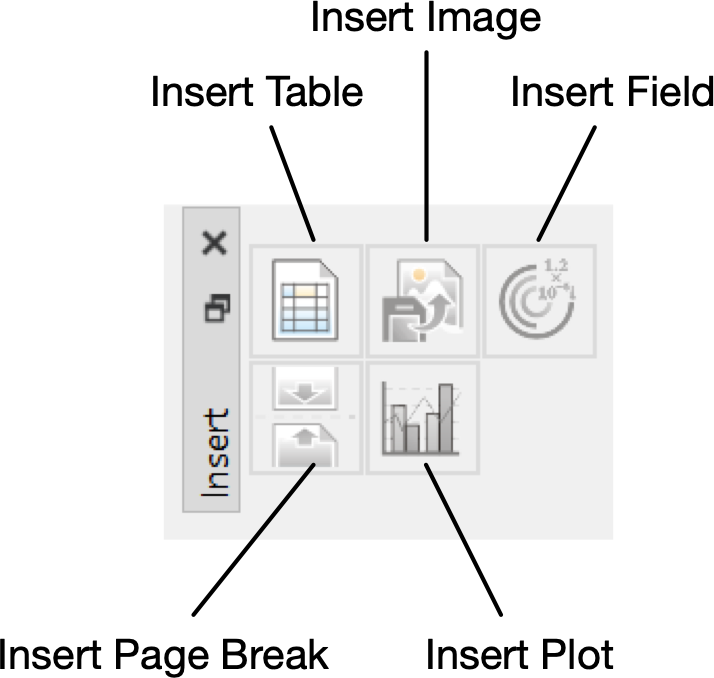
Figure 51 The Insert Dock, Horizontal Orientation
Debug Dock
You can use the Debug Dock, shown in Figure 52, to perform common debugging functions.
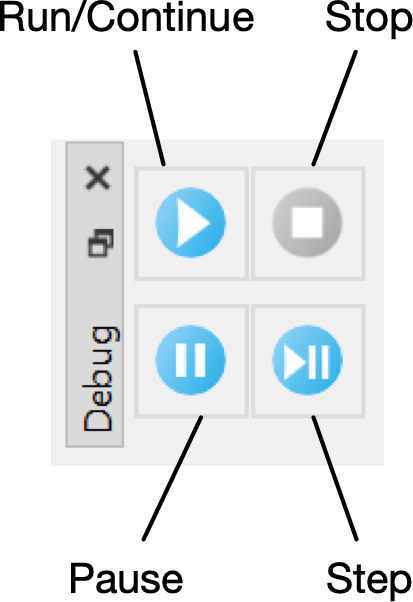
Figure 52 The Debug Dock, Horizontal Orientation
Font Dock
You can use the Font Dock, shown in Figure 53, to change either the font of currently selected text or the font of newly entered text. You can also use this dock to change the font used for mathematical elements.
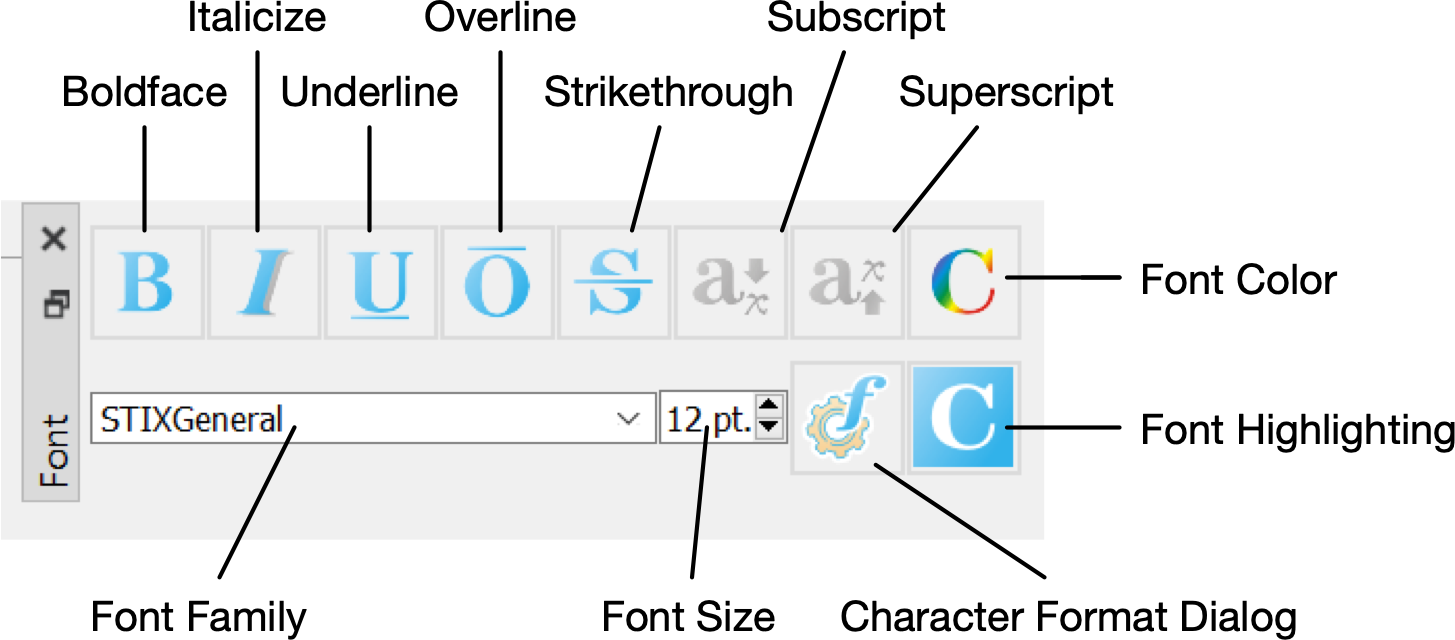
Figure 53 The Font Dock, Horizontal Orientation
Block Dock
You can use the Block Dock, shown in Figure 54, to change paragraph and table indentation, spacing, and alignment.
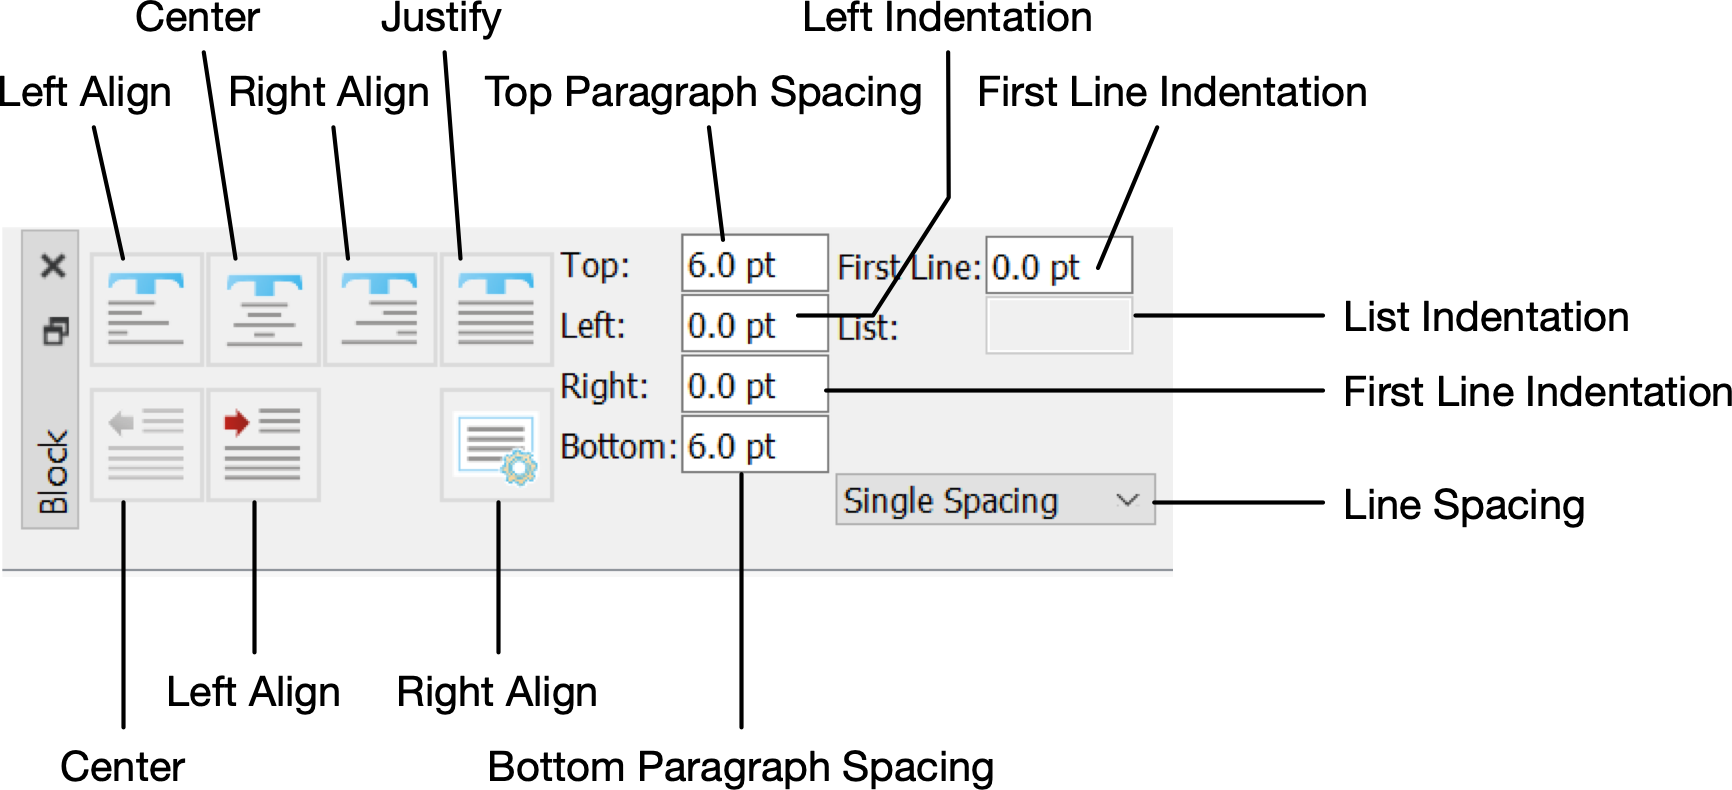
Figure 54 The Block Dock, Horizontal Orientation
List Dock
You can use the List Dock, shown in Figure 55, to create or modify ordered and unordered lists.
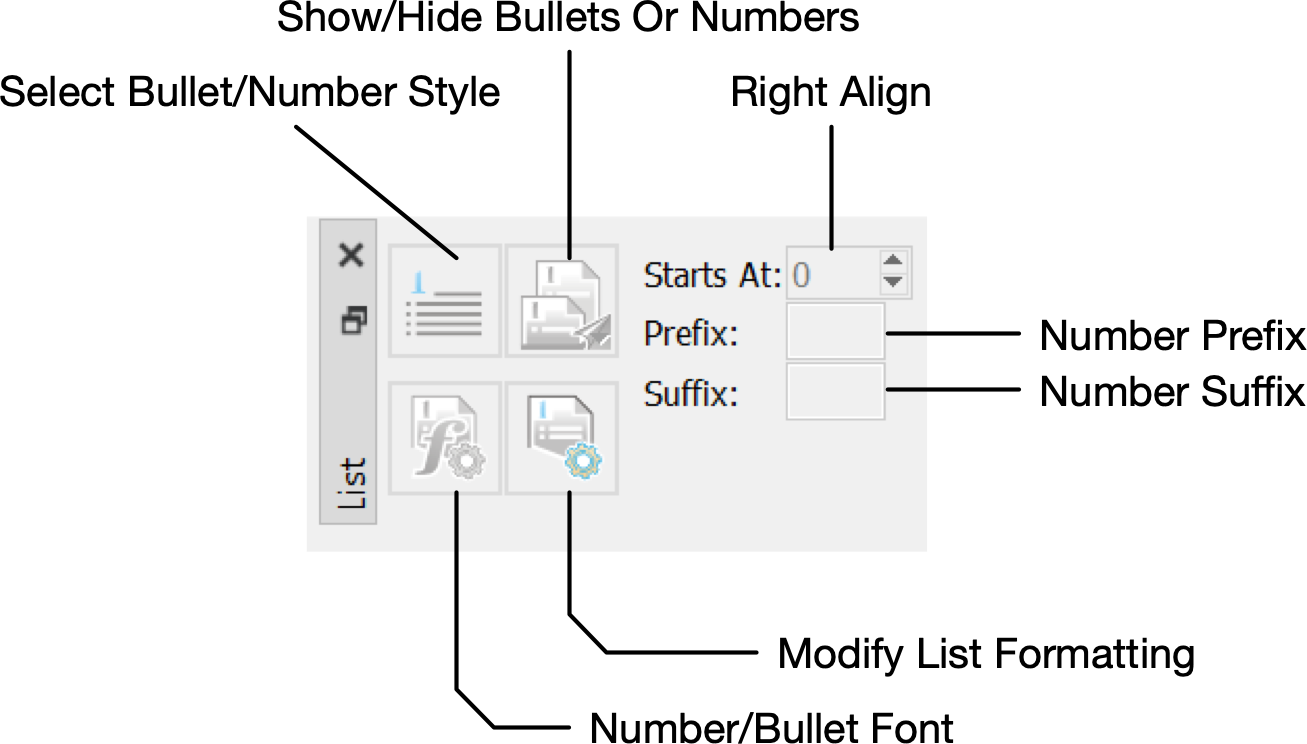
Figure 55 The List Dock, Horizontal Orientation
Operator Dock
You can use the Operator Dock, shown in Figure 56, to create or modify the appearance of operators. Imposing parenthesis, brackets, or braces on an operator will also modify the order of operations for the operator.
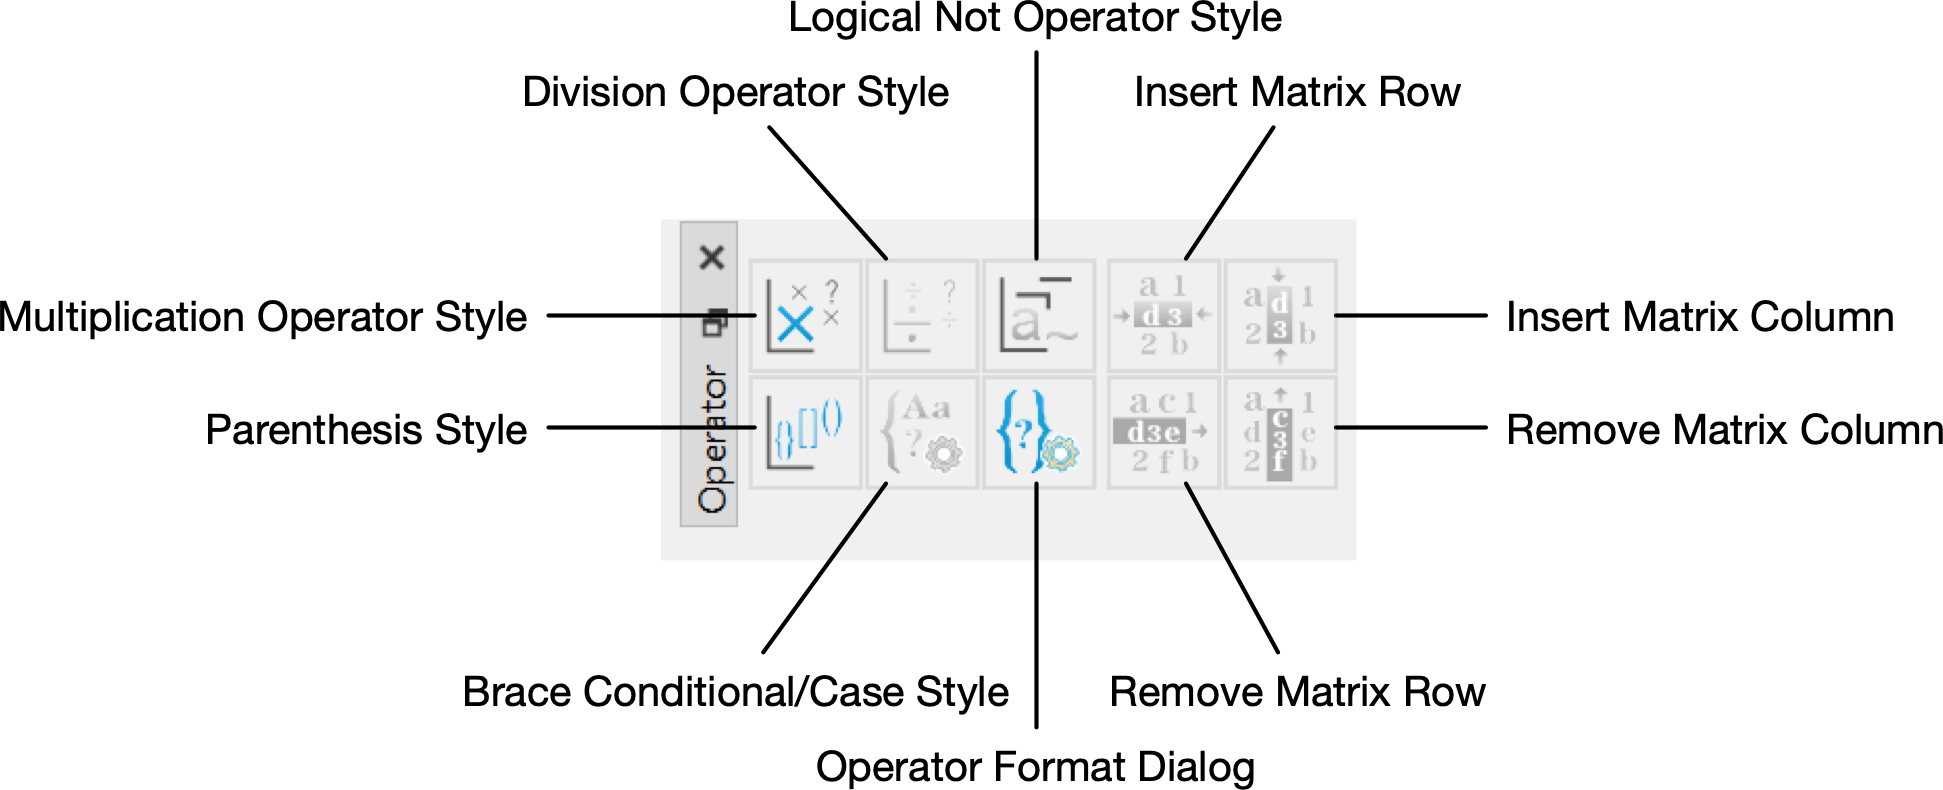
Figure 56 The Operator Dock, Horizontal Orientation
Basic Math Dock
You can use the Basic Math Dock, shown in Figure 57 and Figure 58, to insert commonly used mathematical operators. Several widely used operators are placed both on this dock and on docks dedicated to more specialized operations.
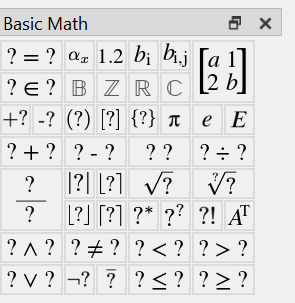
Figure 57 The Basic Math Dock, Vertical Orientation
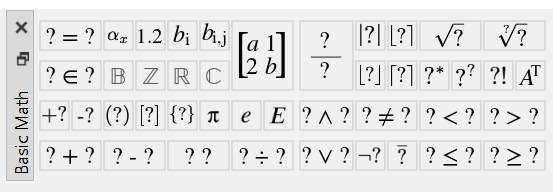
Figure 58 The Basic Math Dock, Horizontal Orientation
Table 1 lists the various controls and their purpose.
Symbol |
Function |
|---|---|
\(? =\; ?\) |
Insert an assignment or test for equality. The meaning of this operator depends on context. |
\(a _ x\) |
Insert a variable name. |
\(1.2\) |
Insert a literal value, including complex values and strings. |
\(b _ i\) |
Insert a subscript with single dimension. You can use this operator with matricies and tuples. |
\(b _ { i,j }\) |
Insert a subscript with two dimensions. You can use this operator with matrices. |
\(\left [ \begin{matrix} a & 1 \\ 2 & b \end{matrix} \right ]\) |
Inserts a matrix or array. |
\(? \in\; ?\) |
Inserts an element of set operator. This operator can be used to force the type of a variable and can be used as a set relational operator. |
\(\mathbb{B}\) |
Inserts a boolean set type. |
\(\mathbb{Z}\) |
Inserts an integer set type. |
\(\mathbb{R}\) |
Inserts a real set type. |
\(\mathbb{C}\) |
Inserts a complex set type. |
\(\pi\) |
Inserts the special value \(\pi\). |
\(e\) |
Inserts Euler’s number, \(e\). |
\(\mathit{E}\) |
Inserts the machine epsilon for real values. |
\(? + ?\) |
Inserts an addition operator. |
\(? - ?\) |
Inserts a subtraction operator. |
\(? \; ?\) |
Inserts a multiplication operator. |
\(? \div ?\) |
Inserts a division (obelus) operator. |
\(\frac{?}{?}\) |
Inserts a division (fraction) operator. |
\(\left | ? \right |\) |
Insert an absolute value, magnitude, set cardinality, or matrix determinant operator. Exact behavior depends on context. |
\(\left \lfloor ? \right \rceil\) |
Inserts a nearest integer value operator. Calculates the nearest integer to a given value. |
\(\left \lfloor ? \right \rfloor\) |
Inserts a floor operator. Calculates the closest integer equal to or less than the the supplied value. |
\(\left \lceil ? \right \rceil\) |
Inserts a ceiling operator. Calculates the closest integer greater than or equal to the supplied value. |
\(\sqrt{?}\) |
Inserts a square root operator. Calculates the square root of a value. |
\(\sqrt[?]{?}\) |
Inserts an n th root operator. Calculates the n th root of a value. |
\(? ^ {*}\) |
Inserts a complex conjugate operator. Calculates the complex conjugate of a value. If applied to a matrix, this operator will calculate the per-element complex conjugate of each element without performing a transpose. |
\(? ^ {T}\) |
Inserts a transpose operator. Performs a matrix transpose operation. |
\(? ^ {H}\) |
Inserts a conjugate transpose or Hermitian transpose operator. This operator is mathematically equivalent to \(\left ( ? ^ {T} \right ) ^ {*}\). |
\(? \neq \; ?\) |
Inserts a not-equal-to relational operator. |
\(? < \; ?\) |
Inserts a less-than relational operator. |
\(? > \; ?\) |
Inserts a greater-than relational operator. |
\(? > \; ?\) |
Inserts a greater-than relational operator. |
\(? \leq \; ?\) |
Inserts a less-than or equal to relational operator. |
\(? \geq \; ?\) |
Inserts a greater-than or equal to relational operator. |
\(? \; \land \; ?\) |
Inserts a logical ‘’and’’ operator. |
\(? \; \lor \; ?\) |
Inserts a logical ‘’or’’ operator. |
\(\neg ?\) |
Inserts a unary logical ‘’not’’ operator. |
\(\overline{?}\) |
Inserts an overbar not operator. |
Sets/Logic Dock
You can use the Sets/Logic Dock, shown in Figure 59 and Figure 60, to insert mathematical operators and values associated with sets and boolean algebra.
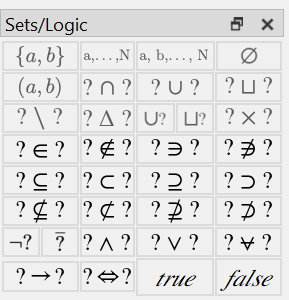
Figure 59 The Sets/Logic Dock, Vertical Orientation
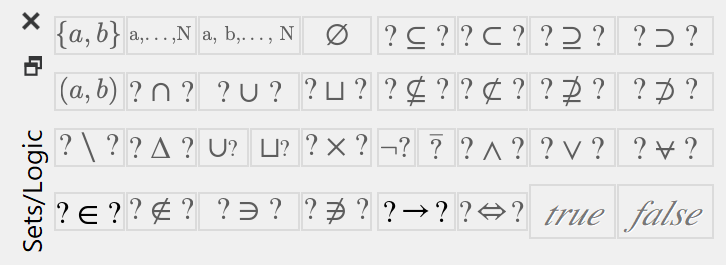
Figure 60 The Sets/Logic Dock, Horizontal Orientation
Table 2 lists the various controls and their purpose.
Symbol |
Function |
|---|---|
\(\left \lbrace a, b \right \rbrace\) |
Inserts a literal set containing other values. |
\(a, \ldots, N\) |
Inserts a range that implicitly increments by 1. |
\(a, b, \ldots, N\) |
Inserts a range that explicitly increments by \(b - a\). |
\(\varnothing\) |
Inserts an empty set special value. |
\(\left ( a. b \right )\) |
Inserts a literal tuple, triple, etc. containing other values. |
\(? \; \cap \; ?\) |
Inserts a binary set intersection operator. |
\(? \; \cup \; ?\) |
Inserts a binary set union operator. |
\(? \; \sqcup \; ?\) |
Inserts a binary set disjoint union operator. |
\(? \; \setminus \; ?\) |
Inserts a binary set relative difference operator. |
\(? \; \Delta \; ?\) |
Inserts a binary set symmetric difference operator. |
\(\bigcup \; ?\) |
Inserts an nary set union difference operator. |
\(\bigsqcup \; ?\) |
Inserts an nary set disjoint union difference operator. |
\(? \; \times \; ?\) |
Inserts a binary cartesian product operator. |
\(? \in\; ?\) |
Inserts an element of set operator. This operator can be used to force the type of a variable and can be used as a set relational operator. |
\(? \notin\; ?\) |
Inserts a not element of set relational operator. You can use this operator to check if a value is not contained within a set. |
\(? \ni\; ?\) |
Inserts a set contains relational operator. You can use this operator to check if a set contains a value. |
\(? \not\ni\; ?\) |
Inserts a set does not contain relational operator. You can use this operator to check if a set does not contain a value. |
\(? \subseteq\; ?\) |
Inserts a subset relational operator. |
\(? \subset\; ?\) |
Inserts a proper subset relational operator. |
\(? \supseteq\; ?\) |
Inserts a superset relational operator. |
\(? \supset\; ?\) |
Inserts a proper superset relational operator. |
\(? \nsubseteq\; ?\) |
Inserts a not subset relational operator. |
\(? \not\subset\; ?\) |
Inserts a not proper subset relational operator. |
\(? \nsupseteq\; ?\) |
Inserts a not superset relational operator. |
\(? \not\supset\; ?\) |
Inserts a not proper superset relational operator. |
\(\neg ?\) |
Inserts a unary not operator. |
\(\overline{?}\) |
Inserts an overline not operator. |
\(? \;\land\; ?\) |
Inserts a logical and operator. |
\(? \;\lor\; ?\) |
Inserts a logical or operator. |
\(? \, \lor\mspace{-17mu}-\; ?\) |
Inserts a logical exclusive or operator. |
\(? \rightarrow\; ?\) |
Inserts a logical conditional operator. You can also used this operator to conditionally evaluate the right hand expression. |
\(? \Leftrightarrow\; ?\) |
Inserts a logical biconditional operator. |
\(true\) |
Inserts a logical ‘’true’’ special value. You can also use any non-zero numeric value for ‘’true’’. |
\(false\) |
Inserts a logical ‘’false’’ special value. You can also use a numeric value of 0 for ‘’false’’. |
Matrix Dock
You can use the Matrix Dock, shown in Figure 61 and Figure 62, to insert matrix specific operators.
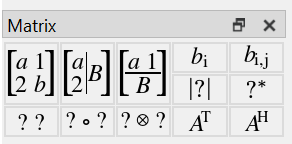
Figure 61 The Matrix Dock, Vertical Orientation
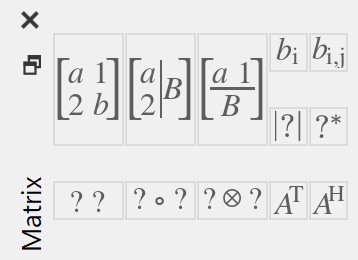
Figure 62 The Matrix Dock, Horizontal Orientation
Table 3 lists the various controls and their purpose.
Symbol |
Function |
|---|---|
\(\left [ \begin{matrix} a & 1 \\ 2 & b \end{matrix} \right ]\) |
Inserts a matrix or array. |
\(\left [ \begin{array}{c} a \\ 2 \end{array} \Big\vert\; B \right ]\) |
Inserts a matrix combine operator, combining matrices left-to-right. |
\(\left [ \frac{a \; 1}{B} \right ]\) |
Inserts a matrix combine operator, combining matrices top-to-bottom. |
\(b _ i\) |
Insert a subscript with single dimension. You can use this operator with matricies and tuples. The operator will reference elements in reading order, by columns, then by rows. |
\(b _ { i,j }\) |
Insert a subscript with two dimension. |
\(\left | ? \right |\) |
Insert a determinate operator. You can also use this operator to calculate absolute value, magnitude, or set cardinality. The exact behavior depends on context. |
\(? ^ {*}\) |
Inserts a complex conjugate operator. Calculates the complex conjugate of each element of a matrix without also performing a transpose. You can also use this operator to calculate the complex conjugate of other values. |
\(? \; ?\) |
Inserts a multiplication operator. |
\(? \; \circ \; ?\) |
Inserts a Hadamard product operator. |
\(? \; \otimes \; ?\) |
Inserts a Kronecker product operator. |
\(? ^ {T}\) |
Inserts a transpose operator. Performs a matrix transpose operation. |
\(? ^ {H}\) |
Inserts a conjugate transpose or Hermitian transpose operator. This operator is mathematically equivalent to \(\left ( ? ^ {T} \right ) ^ {*}\). |
Control Flow Dock
You can use the Control Flow Dock, shown in Figure 63, to insert specialized operators used to define complex algorithms that require iteration or conditional evaluation.
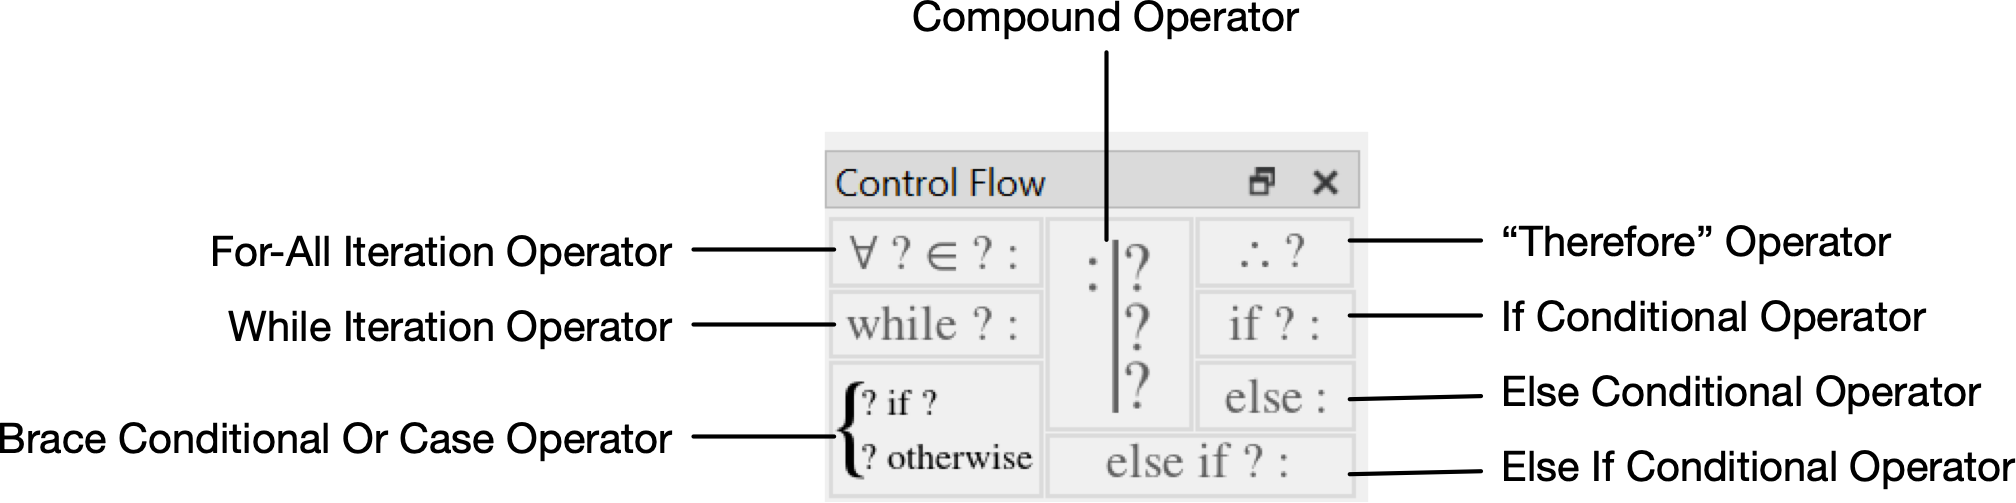
Figure 63 Control Flow Dock, Vertical Orientation
Function Dock
You can use the Function Dock, shown in Figure 64 and Figure 65, to simplify the insertion of Aion functions into your algorithm or model.
You can use the ‘’search’’ line to search for functions by keyword. Adding additional keywords will narrow the search.
You can use the  button to either define a user
defined function or use a function.
button to either define a user
defined function or use a function.
You can use the  button to obtain help about the currently
selected function.
button to obtain help about the currently
selected function.
You can insert a selected standard function by double clicking on it or by
clicking on the insert standard function icon,  .
.

Figure 64 Function Dock, Horizontal Orientation
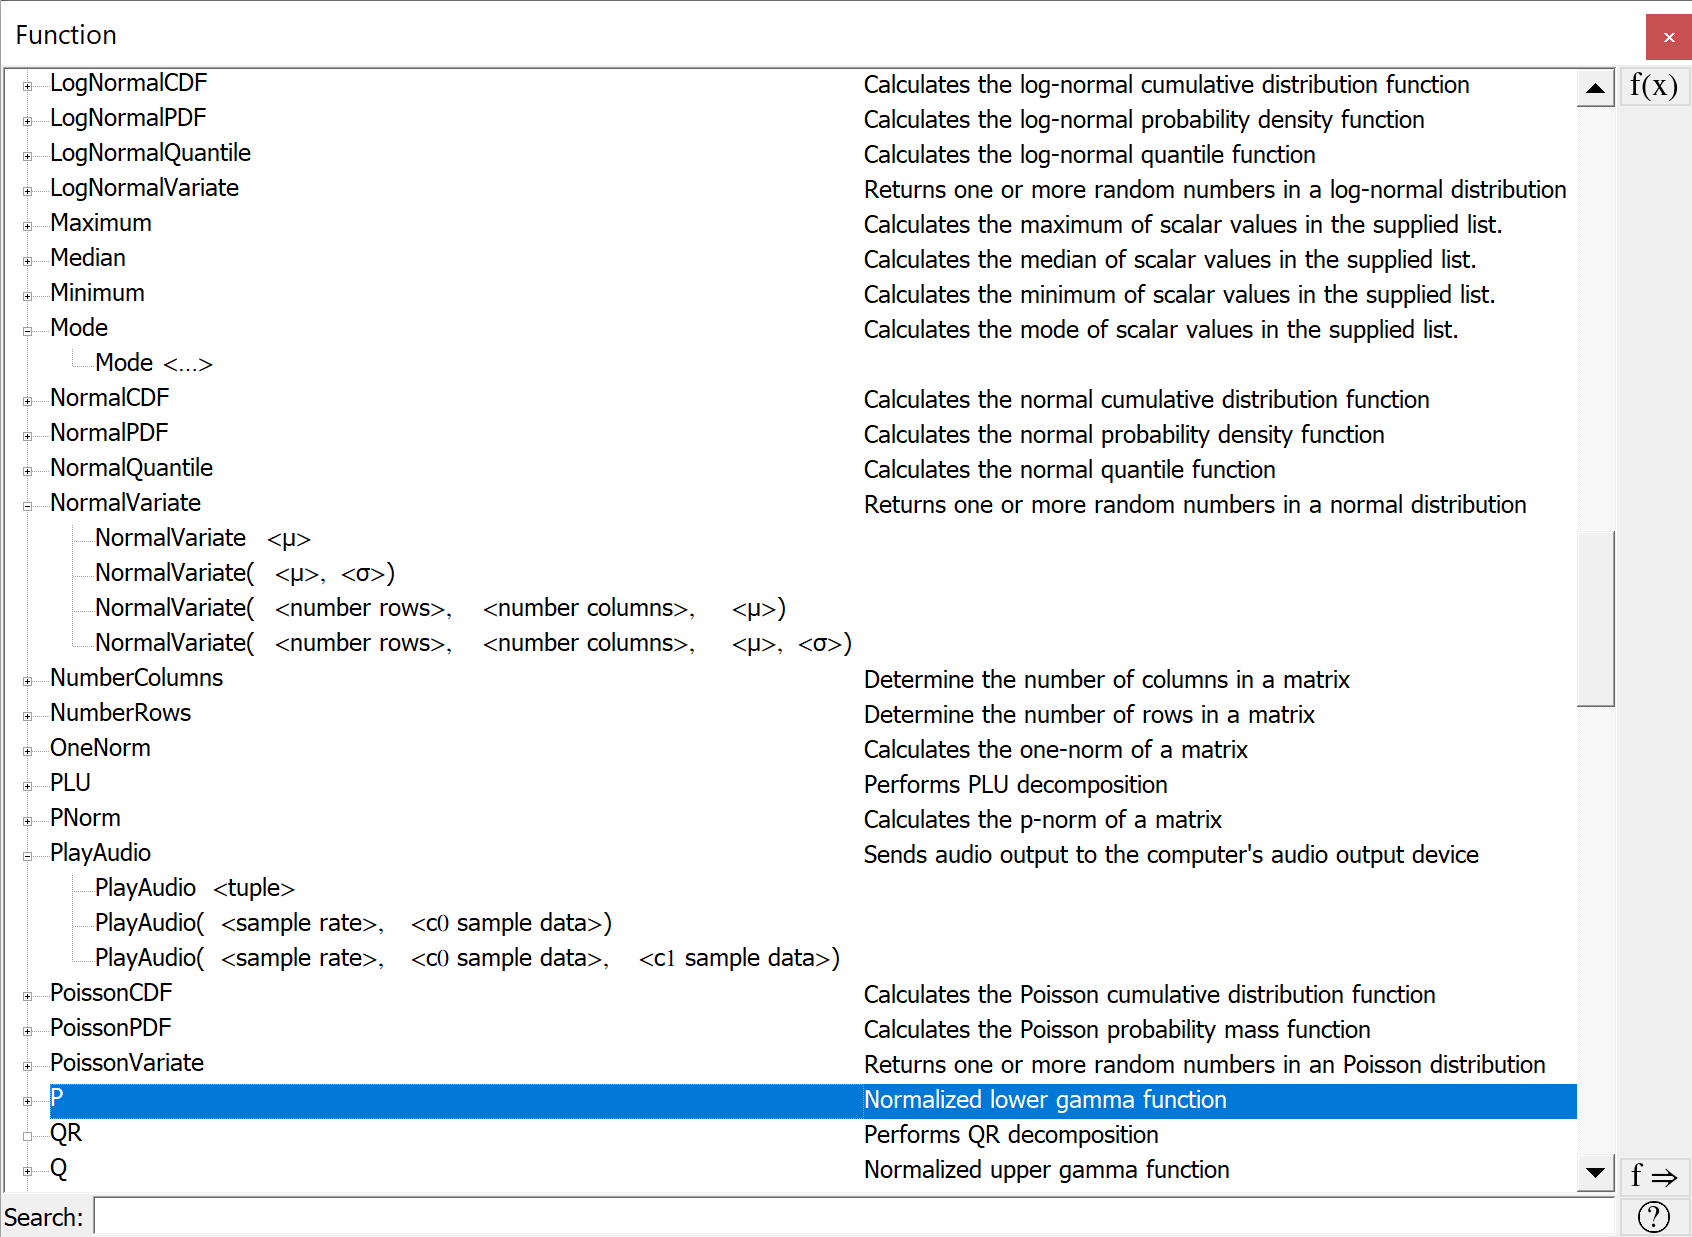
Figure 65 Function Dock, Floating
Greek Dock
You can use the Greek Dock, shown in Figure 66, to easily insert Greek characters into text or into mathematical elements.
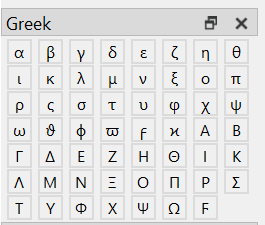
Figure 66 Greek Dock, Vertical Orientation
Symbols Dock
You can use the Symbols Dock, shown in Figure 67, to easily insert special symbols into text or into mathematical elements. Note that some symbols can only be inserted into text and will be disabled when the cursor is in a mathematical element.
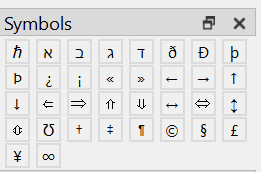
Figure 67 Symbols Dock, Vertical Orientation
Page Dock
You can use the Page Dock, shown in Figure 68, to adjust the page size, page orientation, and page margins.

Figure 68 Page Dock, Horizontal Orientation
Table Dock
You can use the Table Dock, shown in Figure 69, to adjust table global parameters such as the alignment of the table on the page and default settings for table cells.
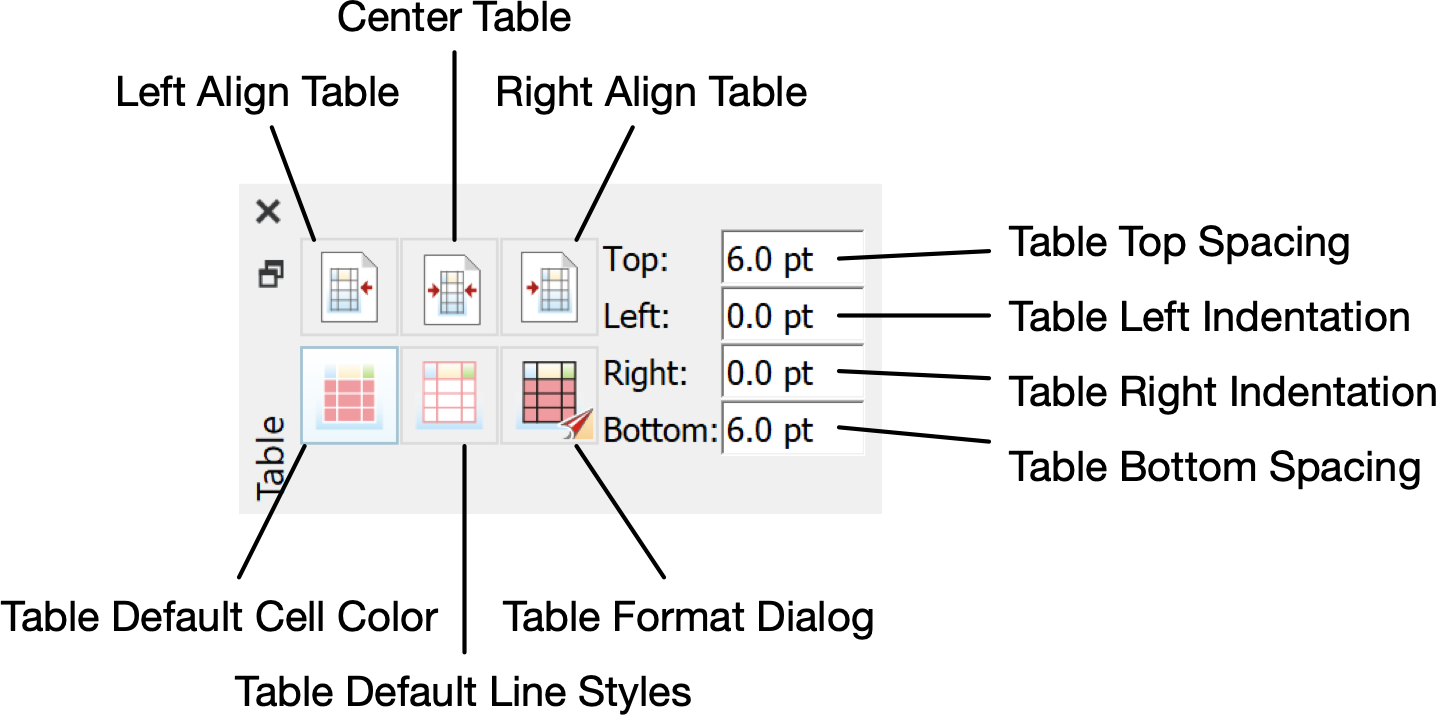
Figure 69 Table Dock, Horizontal Orientation
Table Cell Dock
You can use the Table Cell Dock, shown in Figure 70, to adjust the characteristics of individual table cells or groups of table cells. You can use this dock to quickly add and remove rows and columns, merge or unmerge cells, and change the appearance of cells within the document.
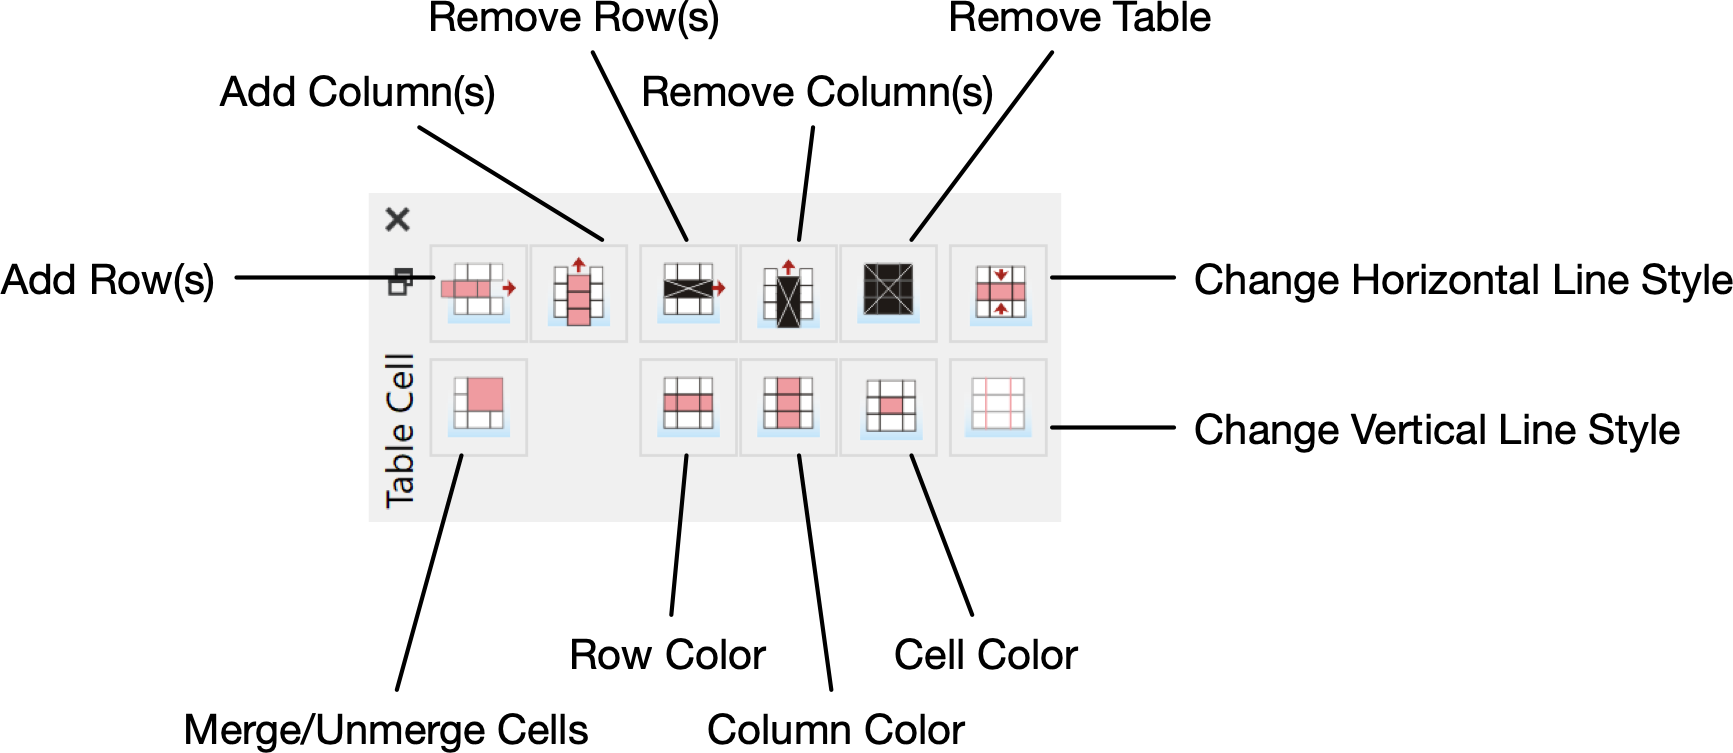
Figure 70 Table Cell Dock, Horizontal Orientation
Image Dock
You can use the Image Dock, shown in Figure 71, to rotate and scale images.
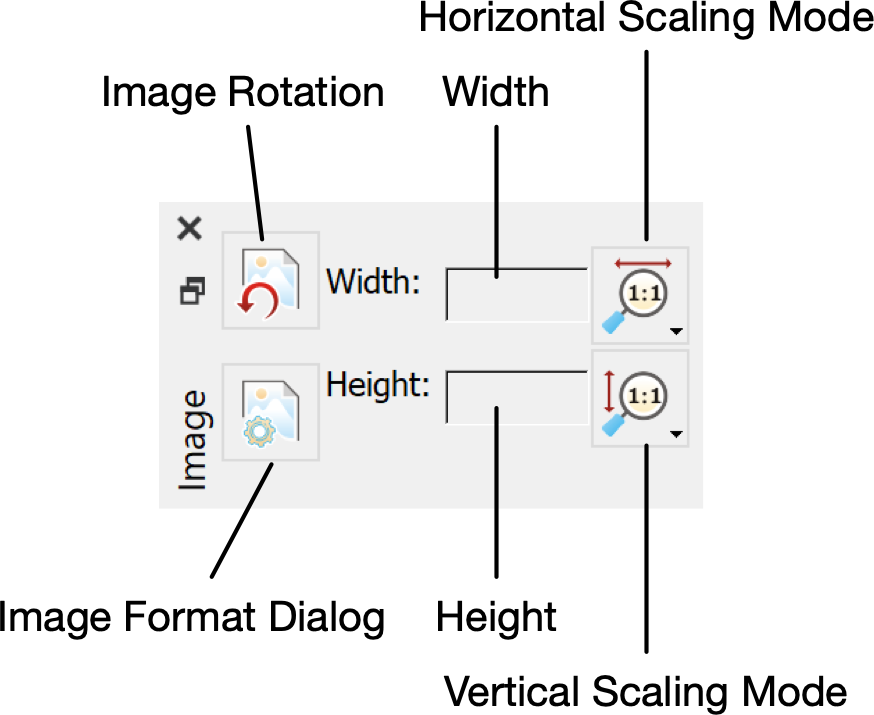
Figure 71 Image Dock, Horizontal Orientation
Field Dock
You can use the Field Dock, shown in Figure 72, to adjust the characteristics of fields used to display the results of your model or algorithm.
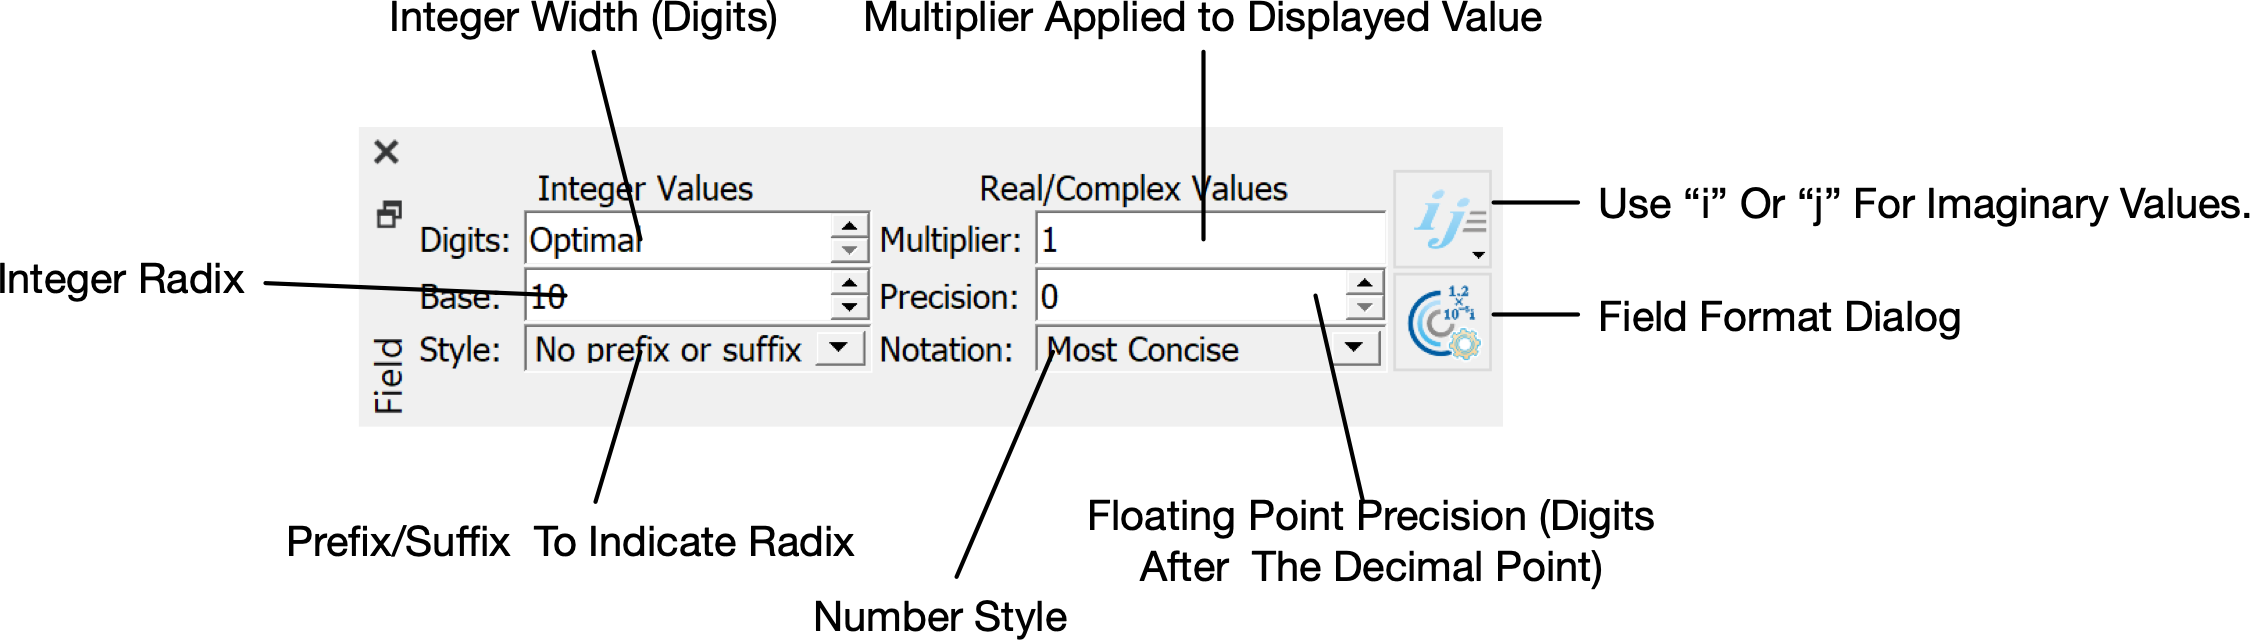
Figure 72 Field Dock, Horizontal Orientation
Status Bar
Aion will display a status bar along the bottom of the screen under three scenarios:
When compiling or exporting your document.
When running or debugging your algorithm or model.
After an error occurs.
When compiling or exporting your document, the status bar will show progress to completion.
When running or debugging your algorithm or model, the status bar will pulsate to indicate activity.
When an error occurs, the status bar will display a brief message explaining the error. Note that the mathematical element(s) where errors were found will be highlighted in red. Hovering over a highlighted element will provide additional details regarding the error.